Tag Archive for: engine

Damaged Vw threads

Happy Thursday boys and girls. I can’t believe that today is the last day of July. It is crazy when you realize how fast the year has gone by. Okay, enough reminiscing, it is time for Shop Shots!

VW engine failureThis may not look like something out of the ordinary, but it is. This engine was delivered to us a few days ago. When they took it off the truck I was shocked. Shocked because I had no idea what the heck type of engine it was. I have seen plenty of VW engines, and this didn’t look anything like that. That is because it is NOT a VW engine. It is for a dang Routan.

I got some of the story on why we are replacing a Routan engine with a junkyard engine. It seems that a customer drove through water high enough to pull water into the engine. I don’t know why people do that. It should be interesting to see this Routan get an engine replacement. I will keep everyone updated when the repair is done. Maybe there will be some cool pictures of the damage.

Volkswagen wiring problem engineThis is a much less rare thing. You are looking at a B7 Passat VR6. This car had some type fault for a Knock sensor. There is a Tech Tip, or a TSB for this issue. The repair is replacing the engine room harness. There are probably about 30 connectors on that harness. Replacing an engine harness can be a big task depending on the engine. I talked to the tech working on this car, he said it was one of the easier ones.

Damaged Vw threadsThis last one is a good one. This is a steering knuckle from a Touareg. The holes are where the brake caliper bolts on. One of the techs in the shop was replacing the brakes on this Touareg. When he put the bolts back in, the threads got damaged. We retapped the hole, and cleaned up the bolts. Even after that the job went sideways and ruined the treads.

Replacing the knuckle is expensive, and the machine shop didn’t have a heli-coil that size. The solution for this comes in the form of a Time Sert. These things are amazing. You basically drill a bigger hole, and thread a sleeve into the hole. The picture on the left is the repaired bolt hole, the one on the right is the good one. It is a great solution for a job that goes bad.

That does it for another volume of Shop Shots. As always I hope you have enjoyed the pictures and little stories behind them.

Pontiac Engine Build

Hey everyone. Welcome to the first Shot Shots of 2014. Like most of you, it is record cold where I am. I left for work yesterday to an insane 11 degrees. This type of weather can make cars do weird things. Like not shift into gear, or have the battery just die. Please stay safe out there. If you don’t have to travel, DON’T!

I know that Shop Shots is normally a Wednesday post. It turns out that I fell asleep at my computer on Tuesday night. I woke up to my wife yelling at me. She is actually making fun of me about it right now. Now that she has had her fun, its time for the first pictures of 2014.automotive repair with duct tapeIt is always a fun time to see car repairs with Duct Tape. This is the back side of a Passat head light. Someone attempted to install non factory HID headlights. I am generally a fan of HID headlights. I have them installed in my Passat. But these type of kits usually require some modification. Lucky for the customer I was able to get the light seated and installed properly. The bad part is, the adjuster for the headlight was broken. That means the inside of the light just bounces around. The fix? A simple zip tie.

Volkswagen Paint Defects

From the factory Volkswagen has excellent paint. It is among the best in the industry. There is a Honda dealer next to mine. If you look at a new Honda vs a new VW, you can see VW paint is overall a better job. That being said, I have seen paint issues on VWs. This car came in for the first service and for us to look at the dark spot you see here. There was some type of sometime under the clear coat. It is funny, you see something like that and you can’t help but try and wipe it off.

Pontiac Engine BuildLast up is another picture of my buddies engine. I have posted pictures of his car a few times before. He is coming dangerously close to finishing the engine rebuild. He is really taking care to build an engine that near factory. He is doing something similar to what I did with the VR swap. Paint every part, and take the time to get it done right. Also, I am in love with those black valve covers.

That about does it for the first Shop Shots of 2014. I am really excited to kick off this year. I do think that this will be the biggest year for all of us yet. Big things are coming and it will be a wild ride. If you want to help our community grow, please consider sharing the blog. I am sure you know some folks that truly care about their cars. Remember that much of what we talk about applies to all cars, not just VWs.

Luv a dub VW engine problem

I know it has been about forever since I updated the Luv A Dub project. Like many car projects, it is slow going at times. There are things that have to line up to get a project really rolling. I think we are just at the edge of this project really taking off.

I wrote a post a while back about the donor car I bought for the engine and the transmission. The 1998 Jetta had a VR6 paired with an automatic trans. When I got that Jetta I knew it had engine issues, and it would require some work to get running. The other issue is I wanted a manual transmission. I had a transmission that I was getting for free. It turns out that a transmission from a 4cyl tdi will not bolt up to a VR6. Seems pretty logical when I think about it. I just had dreams of getting a free transmission.

The transmission quest was a bug success. I found an transmission AND an engine for $400. The engine is a VR6 as well. I will be picking up the engine and transmission on Thursday and update you guys with pictures. The plan is to use that engine and transmission in the Cabby.

Since I the engine from the Jetta, I figured I would disassemble it and see just how bad the damage was. The engine had a blown head gasket. Below is a video of when I drained the oil. You will notice that it looks like water coming out of the engine. That is actually water draining out of the oil filter. The brown liquid coming out of the oil pan is oil and coolant mixed. I didn’t expect that much water to be in the oil. I would have started the video sooner. 🙂

This is what happens when oil and coolant mix. It makes a nasty mess. When I disassembled the engine, I found plenty more of the oil/coolant mess. This stuff is pretty tough to clean. It seams that this engine was in pretty bad shape. The tensioners for the timing chain were also broken. Little bits of plastic were stuck in the oil pump. It seems that finding that other VR6 was a really good thing. Below are a few pictures of the VR6 being disassembled. Thanks to my awesome wife for getting helping me out with the pictures.

That is pretty much where I am at with the Cabby. In a totally random turn, I met the guy that owned the car “pre-art”. He drives a 2008 Passat. He was in for an oil change and brought a spare key. Sadly it is not a factory VW key. He said that he is going to email me some pictures of the Cabby before he sold it. I am really looking forward to seeing those pictures.

I also need to let you all know that I will be traveling this week. I will be heading to VW training. I will be getting my hybrid certification. I actually got a chance to drive the Jetta hybrid last week. The car drives good. It has a great amount of power. The torque was fantastic. I will do a full post about it this week. If you guys have any Jetta hybrid questions post them in the comments. I have 2 full days of training. That means plenty of time to get all of our questions answered.


Coolant mixing Shop Shots Auto Mechanic


Hey everyone!

First let me say that I am sorry for Shop Shots being so late today. I got hung up at work longer than I expected. It’s okay because I got some really awesome auto mechanic pictures for you guys today. Enough of my yapping, lets get to it!

20120529-215206.jpg

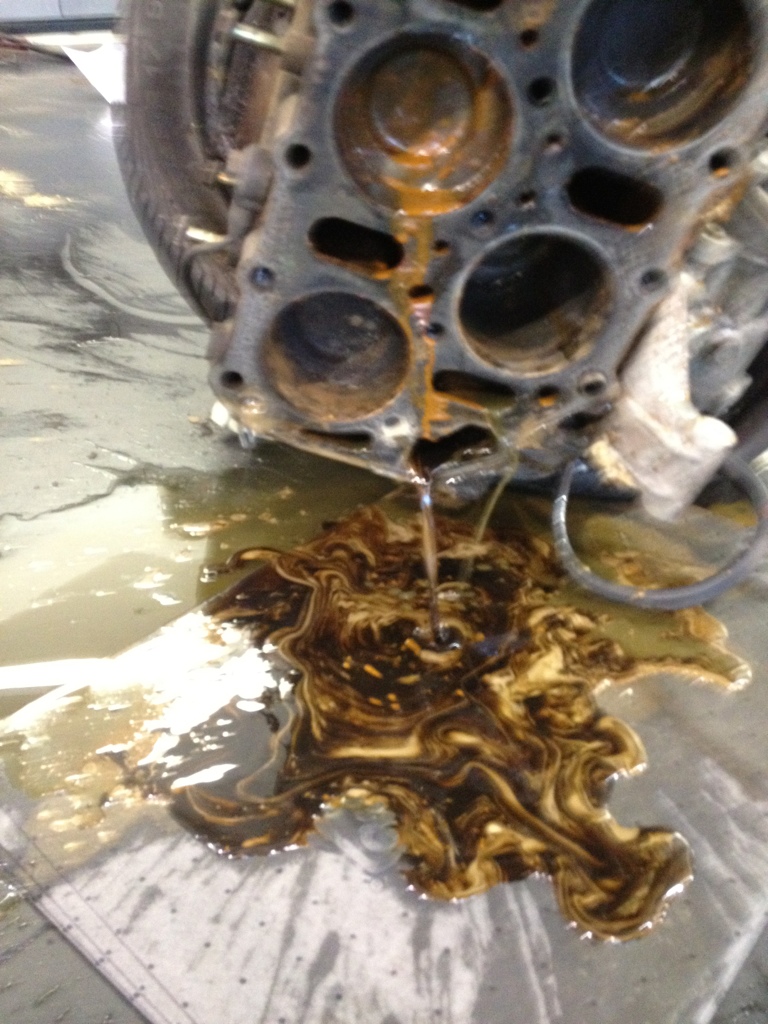
GROSS! What you are looking at here is the coolant bottle of a VW Beetle. If this fluid was in good condition, it would be a nice bright pink color. As you can see here it is brown and chunky. I posted this to Facebook the other day. The comments were awesome.

Jennifer~someone poured a frappacino inside their car?
Suzanne~ Stop leak didn’t work
Stefanie~Are you brewing beer or fixing a VDub? I can’t tell!(<~ my favorite)
Jeremy~someone vomited in their coolant reservoir( <~funniest)

Joe, Chris, Alex, and Brandon all got it right! This is the result of a failed transmission cooler. In order to keep automatic transmission fluid cool, they have a cooler. This will circulate engine coolant through something like a little radiator. Normally, the coolant and transmission fluid does not mix. A failed seal in the cooler caused transmission fluid to be pumped into the coolant. I will be repairing this on Friday. I will tell you guys the super high tech secret way to fix this problem next week. HINT: think Dawn 😉

20120529-215238.jpg

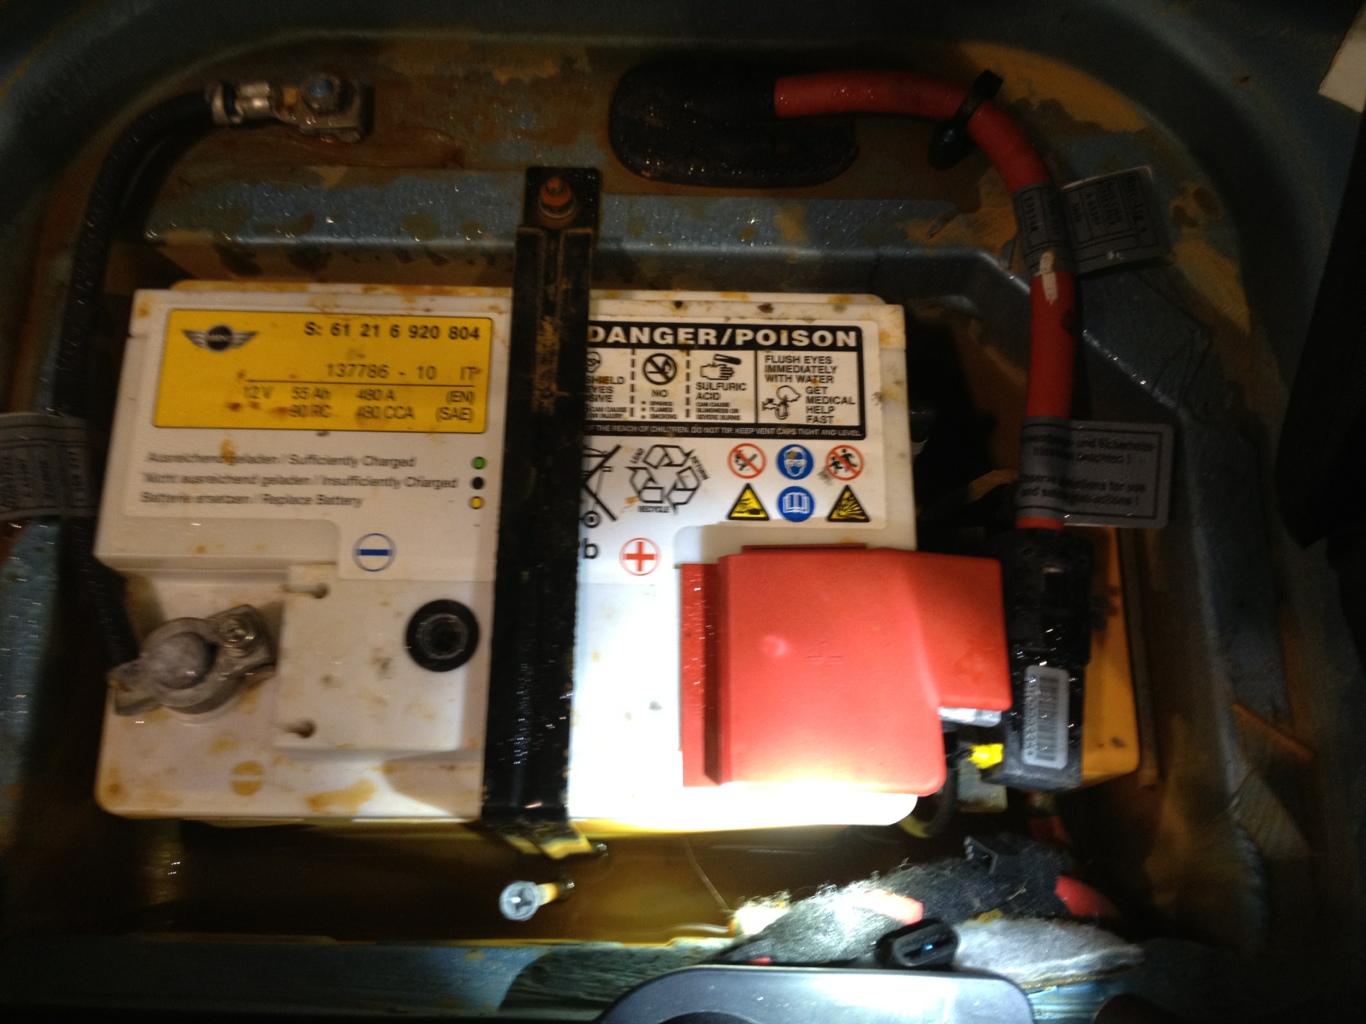
Okay, this one might be a little harder to see. Take note of all the “rust” around the battery. What causes rust class? That’s right WATER! This is the battery of a Mini. The Mini’s battery is located in the trunk where most cars have the spare tire. Due to a water leak, the battery compartment had about 4 inches of water in it. Now, I am not sure who long the battery was under water, but it did make the car not start. If you look just to the right of the big red square you can just barely see a yellow box. The yellow box has some type of fuse assembly inside. The assembly is totally rusted. I am not sure how much of the cables, and fuses will need to be replaced. My guess is this repair will not be cheap. Oh, this was on our used car lot. We don’t service those cars.

Funny story about a Mini. The very first one I worked on was about 6 years ago. It took be 30 minutes to find the hood release. I had to bust out the owners manual. HAHA, what type of mechanic has to read an owners manual to figure out how to open the hood??  Turns out, that Mini’s hood release is on the passenger side! HAHA

20120529-215315.jpg

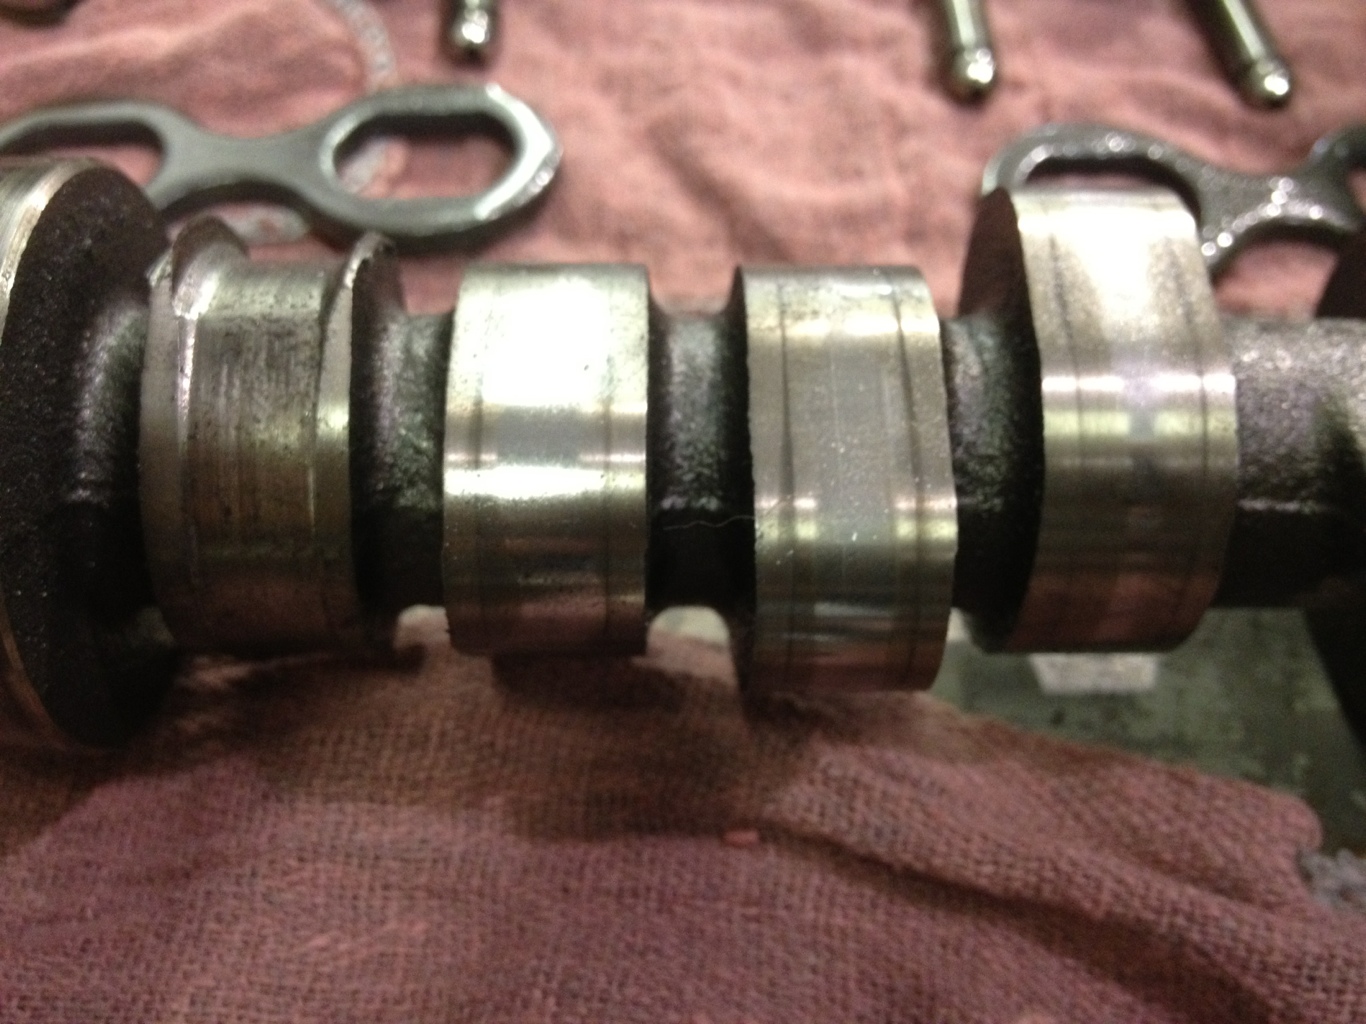
Remember a while back when we talked about Cam Shafts? Well, here is a close up of a cam shaft. The 4 lumps you are looking at are called lobes. They basically turn a rotation into an up and down motion. Ultimately, they open the valves and let air into and out of the engine. But for this picture, look at the lobe on the left. Now, check out the lobe all the way on the right. They should be the same. Now look back at the left lobe. See how there is a “U” shape that was cut into the lobe. This made a heck of a noise. Ok, now check out the next picture.

20120529-215337.jpg

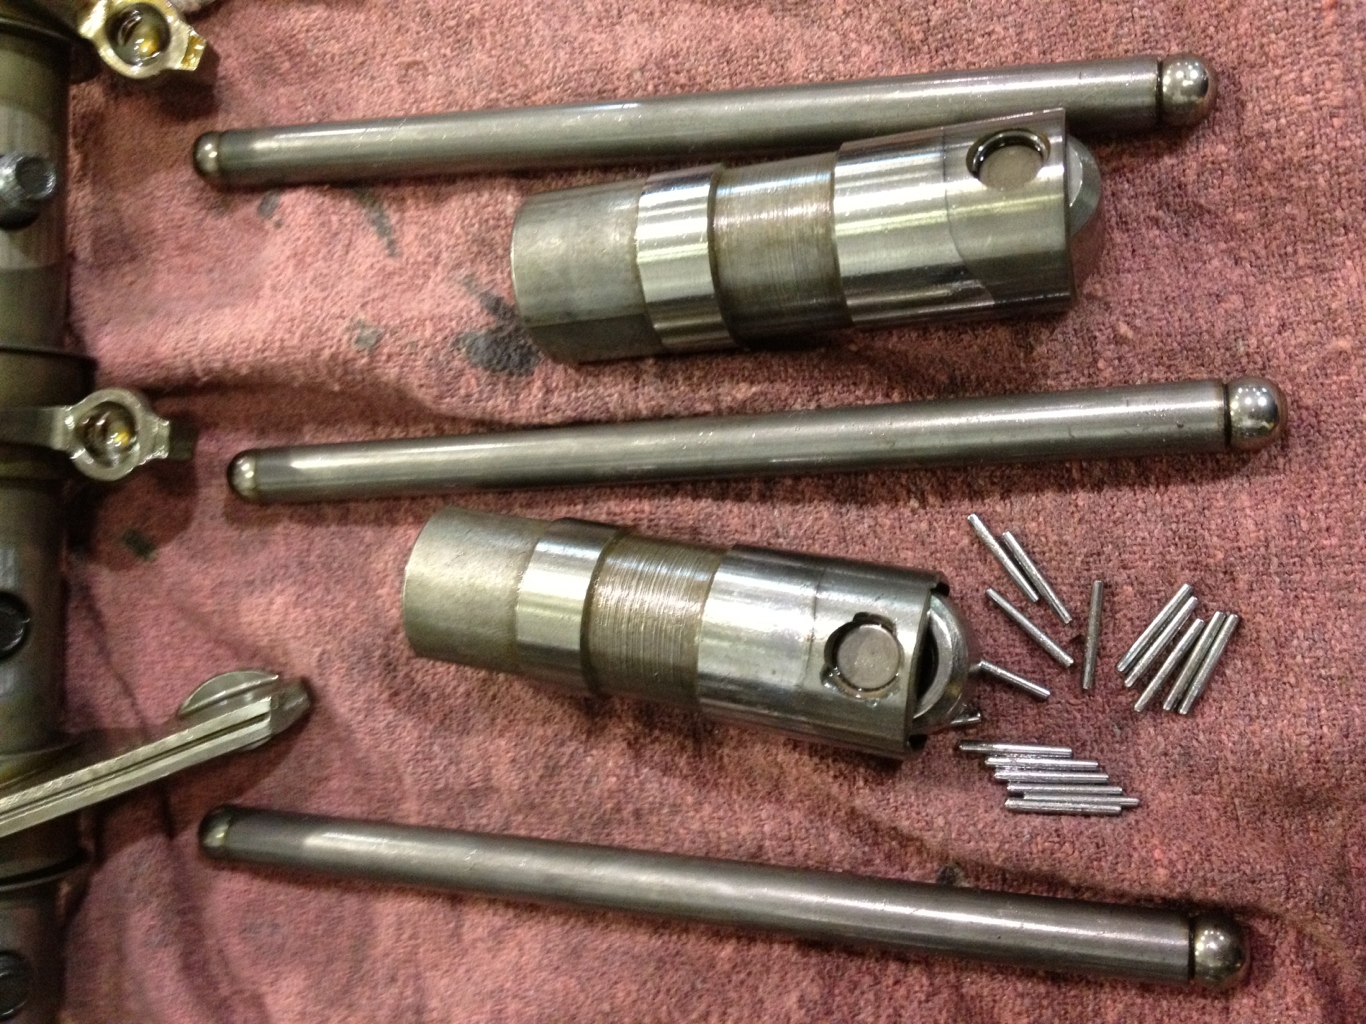
No, you have not traveled back in time. Those are push rods. 😉 This picture goes along with the one of the cam shaft above. The long tubes are push rods. The fat tube with the wheel on the bottom is a lifter. All those little metal rods are part of a bearing set. The lifter somehow got stuck. That is what caused the cam shaft above to be damaged.

I made a little joke about traveling back in time. This type of engine design is REALLY old. VW have not used it in, well I am not really sure. This engine is from a 2009 VW Routan. AKA a Chrysler Town and Country. So does it count as a VW. I guess technically, but to me, it is NO VW! 🙂

Well, that wraps up this weeks auto mechanic pictures. We had some really messed up stuff this week. Hopefully next week I can post some more fun pictures. 🙂

Don’t forget you can also connect with me on Facebook, YouTube and Twitter. Quick note on YouTube, if you are subscribed to the my YouTube Channel, you get to see the videos BEFORE they are posted on the site. Just Sayin ;P Use one of the boxes just to the right ~~~~~~~~~~~~~~~~>>>>


I think that it is important to take a step back and cover the basics. I get caught up in a very technical world, with people that know the terms I use. I don’t want anyone to feel like what I am saying is over their head. So today I will give you guys some really common terms your auto mechanic might use. You might not need to understand how these things work, but knowing the terms will can help you make better choices with your car.

Engine block

This is the lower part of the base engine. It houses the pistons, and the crankshaft. It may also have other parts like an oil pump, a water pump, and maybe a balance shaft. Some folks also call this the “Bottom End”. It is generally referred to that way when talking about noises. On older engines, the block may have also contained the cam shaft. I say older, but the 3.8L Routan still has the cam in the block.

Cylinder Head

This is the upper part of the base engine. It can contain the cam shafts, valves, rockers(not the music kind). Most newer model cars have an adjuster in the cylinder head that can change the cam shaft timing. Don’t worry about that just yet, we will get there.

Crank shaft

Located in the engine block, this hunk of metal moves the pistons. It takes a rotating motion and converts it to an up and down motion. At one end, the trans mission bolts the the crank shaft, the other end generally drives the serpentine belt.

Cam Shaft

The cam shaft is also responsible from turning a rotational motion in to an up and down motion. The cam will rotate causing valves to open or close. This is what allows air to enter the engine, and forces air out of the engine.

Timing Belt

This is the belt, or chain, is what connects the CRANK SHAFT to the CAM SHAFT. One of the most important parts of an engine. If the timing belt is not “TIMED” properly, you will get pistons and valves in the wrong place, and the wrong time. Usually resulting in internal engine damage.

Serpentine Belt

This is also called an accessory belt, or belts. This belt is what drives the vehicles accessories. Things like the alternator, power steering pump, air conditioning compressor, and (if you are luck) a super charger. If this belt breaks, it most likely wont do internal engine damage, but it can leave you stranded.

Water Pump

Like many things on cars, this does what its name says it does. It pumps water, well actually, coolant. The water pump pushes water through the engine and pulls heat from it. When it hits the radiator, it exchanges the heat with and cools down. Then back to the engine to start over

Thermostat

Going along with the water pump, the thermostat helps regulate engine temperature. It will “hold” coolant from flowing to the radiator. It does this to heat the car up. It would take forever to get your car to operating temperature with out a thermostat.

Radiator

Located in the very front of your car, the radiator is a big heat exchanger. The hot coolant that flows through it, is cooled by air passing by it. Air is directed through the radiator and pulls the heat away from the coolant.

Heater Core

This is almost the same as a radiator. The only difference is the location. This is located inside the vehicle. Air is blown across the heater core, but instead of flowing into the engine bay, it flows into the cars cabin. The heat pulled from the heater core heats the air and is then directed into the cabin. The heater core is the reason you can stay toasty warm in the winter time.

Brake Booster

We have talked about brakes before, but I don’t think I have talked about the booster. The booster assists the driver in pressing the brake pedal. With out a booster, it would take tons of force applied to the brake to make the car stop. Well maybe not actual tons, but descriptive tons. It works by using engine vacuum to pull a diaphragm. and spring set. This set will provide the assistance you need to help press the brake pedal. You can feel the assist by doing this.

  • Stop your car, then shut it off
  • Press the brake down, you will still feel the assist.
  • Press the brake a few more times, you will notice the pedal getting harder to push.
  • After about 4 times of pressing the pedal, it feel hard as a rock. THAT is what no assist would feel like.

There are so many dang systems on cars that it will take a while to talk about them all. Some parts are easy to explain by writing them. Some just don’t make sense that way. I am trying to build a collection of parts so I can show you guys what the look like. Much like the video I did about a Volkswagen Clock Spring. If you have a car part that you want to know about, post it in the comments. The parts I can’t show you how they work are things like Airbags, ECMs, and other “magical” things. 😉

Also, sign up for the email list. You will get updates about new posts before anyone else! VW is dragging their feet on something, but as soon as they get on the ball, I will have something special for everyone, but the folks on “the list” will get 1st dibs.

If you liked this post, please consider sharing it. It is really easy, just click one of the buttons below.

I can’t believe that this is the 10th volume of Shop Shots! It seemed like just yesterday that you guys were helping me name this series! As always, you will see pictures of the random things that I see around the shop. AND…..GO

This is a close up of some bearing damage inside a manual transmission. This actually belonged to a great friend of mine Daniel. His concern was a noise, and trouble getting into gear. We decided to replace the transmission, but I really wanted to see what went wrong. There was metal in the fluid, so I knew that it was bad new. I did a really early post when I first started this car blog. In that post you can see the metal chunks on the drain plug. This is one of the few manual transmissions I have had an issue with.

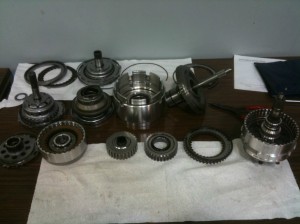
While we are on the subject of transmissions, here is the guts of an automatic transmission. This comes from when I was at training for Routan transmissions. This is about 1/4 of the parts that make up the rings, clutches, gears, seals and so on. Automatic transmissions are really an engineering marvel. Actually, all transmissions are pretty awesome.

This is leaves, pine needles, and dirt built up on the cowl of a Jetta. On the surface it just looks bad, but it is actually a big deal. I have seen countless cars get water leaks due to leaves building up on the cowl and around the windshield. The get stuck in the water drains and that water will go somewhere. The crappy part is that somewhere is inside the car. I actually totaled 2 cars due to water leaks caused by this exact thing! One was a Touareg that was had mold everywhere. The estimate I wrote was for about $42,000 in repairs. Take a minute and make sure you don’t this happening.


Last but not least, this is a quick video of a crazy noise. This car was whistling when it was sitting at idle. When I revved it up, it would stop, but as soon as I let off the gas, it would make this noise. I remember the first time I heard this I thought, “What the hell, this is not gonna be fun to fix”. It turns out it is a really easy fix. There is a check valve that only lets air flow one way. Well it gets stuck and causes this noise. WARNING– this noise is loud, I recommend turning down the volume!

Well, that wraps up another volume of Shop Shots. I am always looking for new post topics, if you have a suggestion, just contact me, or post up in the comments. Also, don’t forget to swing by Humble Mechanic on Facebook and say hi!

So this 07 VW Passat gets towed in on Friday. The customer said something on the engine broke.

We towed it in the shop and found out the engine mount on the passenger side of the car was broken. This is not something that happens all that often, but I have seen it before.

We installed the engine support and removed the mount. This is what we found.

20120220-123200.jpg

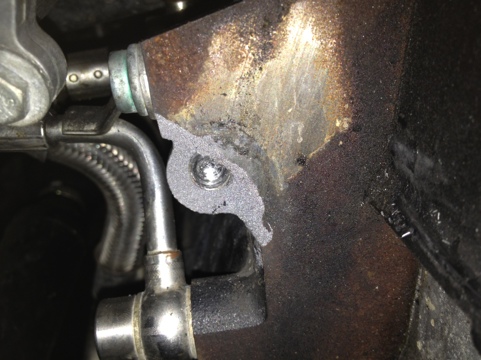
It was obvious that someone had “repaired” the mount. The problem withy the way that it broke is, it actually broke the lower part of the engine. The proper way to fix that is to replace the engine block(the block is the bottom end of the engine). I think that someone would be able to weld it, but we have to stand behind our work.

We called the customer and told him what had happened. He got really mad at us, saying “You guys did all the work on this car”. We had done work on the car, but it was MONTHS ago, and there is not one person in my dealer that would do something that awful.

The customer came by to take a look at the damage. The estimate was in the $7,000 price range. Obviously, he wasn’t a happy guy. Well, it turns out his son had done something to the car. I don’t even know what he was trying to do, but he is the one that added all the washers and nuts on the mount.

20120220-140058.jpg

The customer decided to trade the car in for a new car. The shop will most likely bandage it back together, and send it to auction. Side Note- these are the problems cars at small buy here pay here lots have.

I am all for DIY, just know when your out of your league. Also, know what to call a professional. If you get in a bind like that, just STOP and get some help!!

20120220-140521.jpg