Tag Archive for: DIY

DIY car Repairs

It has happened to me so many times. I am in the middle of a repair and realize I don’t have the tools to finish the job. That generally means another trip to the store. Well when it comes to DIY car repairs a trip to the store may not be an option. There has been a lot of buzz around here about DIY car repairs. There are so many car repairs that are very easy DIYs and even someone with little car knowledge can do. But there are things that you need to consider before jumping into a DIY.

Sponsor of the day:rain eater logo
Rain Eater wiper blades. Wipers are one of the most important safety items on our cars. Think not, you must have never driven in bad weather. When you are ready to replace your wiper blades, a very easy DIY, check out RainEater wipers at RainEater.com. Plus I LOVE that their CEO is the one monitoring social media.

Join me today as we discuss:

  • DIY Oil Change Video
  • Do you have the time for a DIY car repair?
  • Do you have the tools for a DIY car repair?
  • Do you have the space for a DIY car repair?
  • Do you have the know how for a DIY car repair?
  • Do you know where to get the infomation?
  • What is the potential risk for injury?
  • And a bonus you will have to watch the video for 😉
  • Why I have a mech unit on my table
  • and more

Trouble viewing? Watch “5 Things to Consider BEFORE DIY Car Repairs ~ Podcast Episode 93” on YouTube

As always I love to hear your thoughts. Please post them in the comments section below. If you have an idea for a show you can email me, or use the contact me form! Don’t forget to follow me at:

#DIYOilChange

DIYOilChangeIt may shock some folks, but I too must change the oil in my car. Yes even auto mechanics have to maintain their car. So today I will be giving you some awesome and very important tips on changing the oil in your car. We will be using my 2005 Volkswagen Passat 1.8t to learn the right way to change oil. I also need to thank Apex Tuning  for letting me use their shop to do this video for you. This video has been compensated by Collective Bias, Inc. and its advertiser. All opinions are mine alone. #DIYOilChange


Remember any time you are working on your car, safety is priority number one. Please make sure you are working in a safe manor.

Join me for an oil change DIY:

  • Oil filter I use on my VW
  • Engine oil I use on my car Pennzoil Platinum engine oil
  • What to do with used engine oil
  • Working safe
  • Cleaning up after an oil change
  • Removing the oil filter
  • What is double gasket
  • Under car inspecsions
  • Drain plug
  • Tips for filling engine oil
  • and more

Trouble viewing? Watch “How To Change Your Car’s Engine Oil” on YouTube.

As always I love to hear your thoughts. Please post them in the comments section below. If you have an idea for a show you can email me, or use the contact me form! Don’t forget to follow me at:
deutsche auto parts logo

As I mentioned in Shop Shots, I had the pleasure of doing some video work with the Boys at Deutsche Auto Parts. This is the DIY video on replacing a High Pressure Fuel Pump (HPFP) on a 2.0t. This is the first a many videos that we teamed up on. If you have any questions about this DIY, please post them in the comments below.

Be sure to check out all the VW DIY videos by Deutsche Auto Parts on their site, or the Deutsche Auto Parts YouTube channel. For those of you don’t know, Deutsche Auto Parts is an amazing resource for VW parts. Whether you are looking for maintenance parts, repair parts, or unique and performance, check out my buddies at Deutsche Auto Parts.

Thanks for watching, head on over to YouTube and subscribe to the Deutsche Auto Parts channel. They are doing great things over there.

Bad VW gas Cap

Happy Wednesday everyone. It is time for Shot Shots again. There is not many updates beyond the pictures today. Things around the shop are absolutely insane busy. That is a good and bad thing. When it gets this type of busy I feel like we miss things. But as a flat rate technician, it makes for a nice pay check. Okay, lets get to the pics!

Weird things VW drivers Do

Sometimes you see something and just thing “What the heck?”. This is one of those times. One of the boys in the shop called me over to show this to me. This customer has a bungee cord wrapped around their drivers seat. Maybe it is for holding the trim on? Maybe it gives them a little extra butt support? Post up your thoughts in the comments. I am out of ideas LOL.

VW electrical ProblemsWe have heard that all VWs have electrical problems or wiring problems. This one was a good one. This Jetta came from one of the rental car companies. I think the original concern was rear lights not working. The tech went round and round with chasing wires, and he even replaced the main electrics module(Body control module). The car was blowing 1 certain fuse in a strange way.

I think he did almost everything right. Where he got hung up was dismissing a key bit of info he had. The interior lights didn’t work. No matter what he did the lights would not work. When he pulled down the front light he found this. When the light was installed (I am not sure if it was from the factory, or a repair) the screw that holds the light was ran into the harness. The symptoms were tricky, but I am glad he found the issue.

The key here is to always pay attention to all the symptoms of a car. I have a post coming soon about this exact thing.

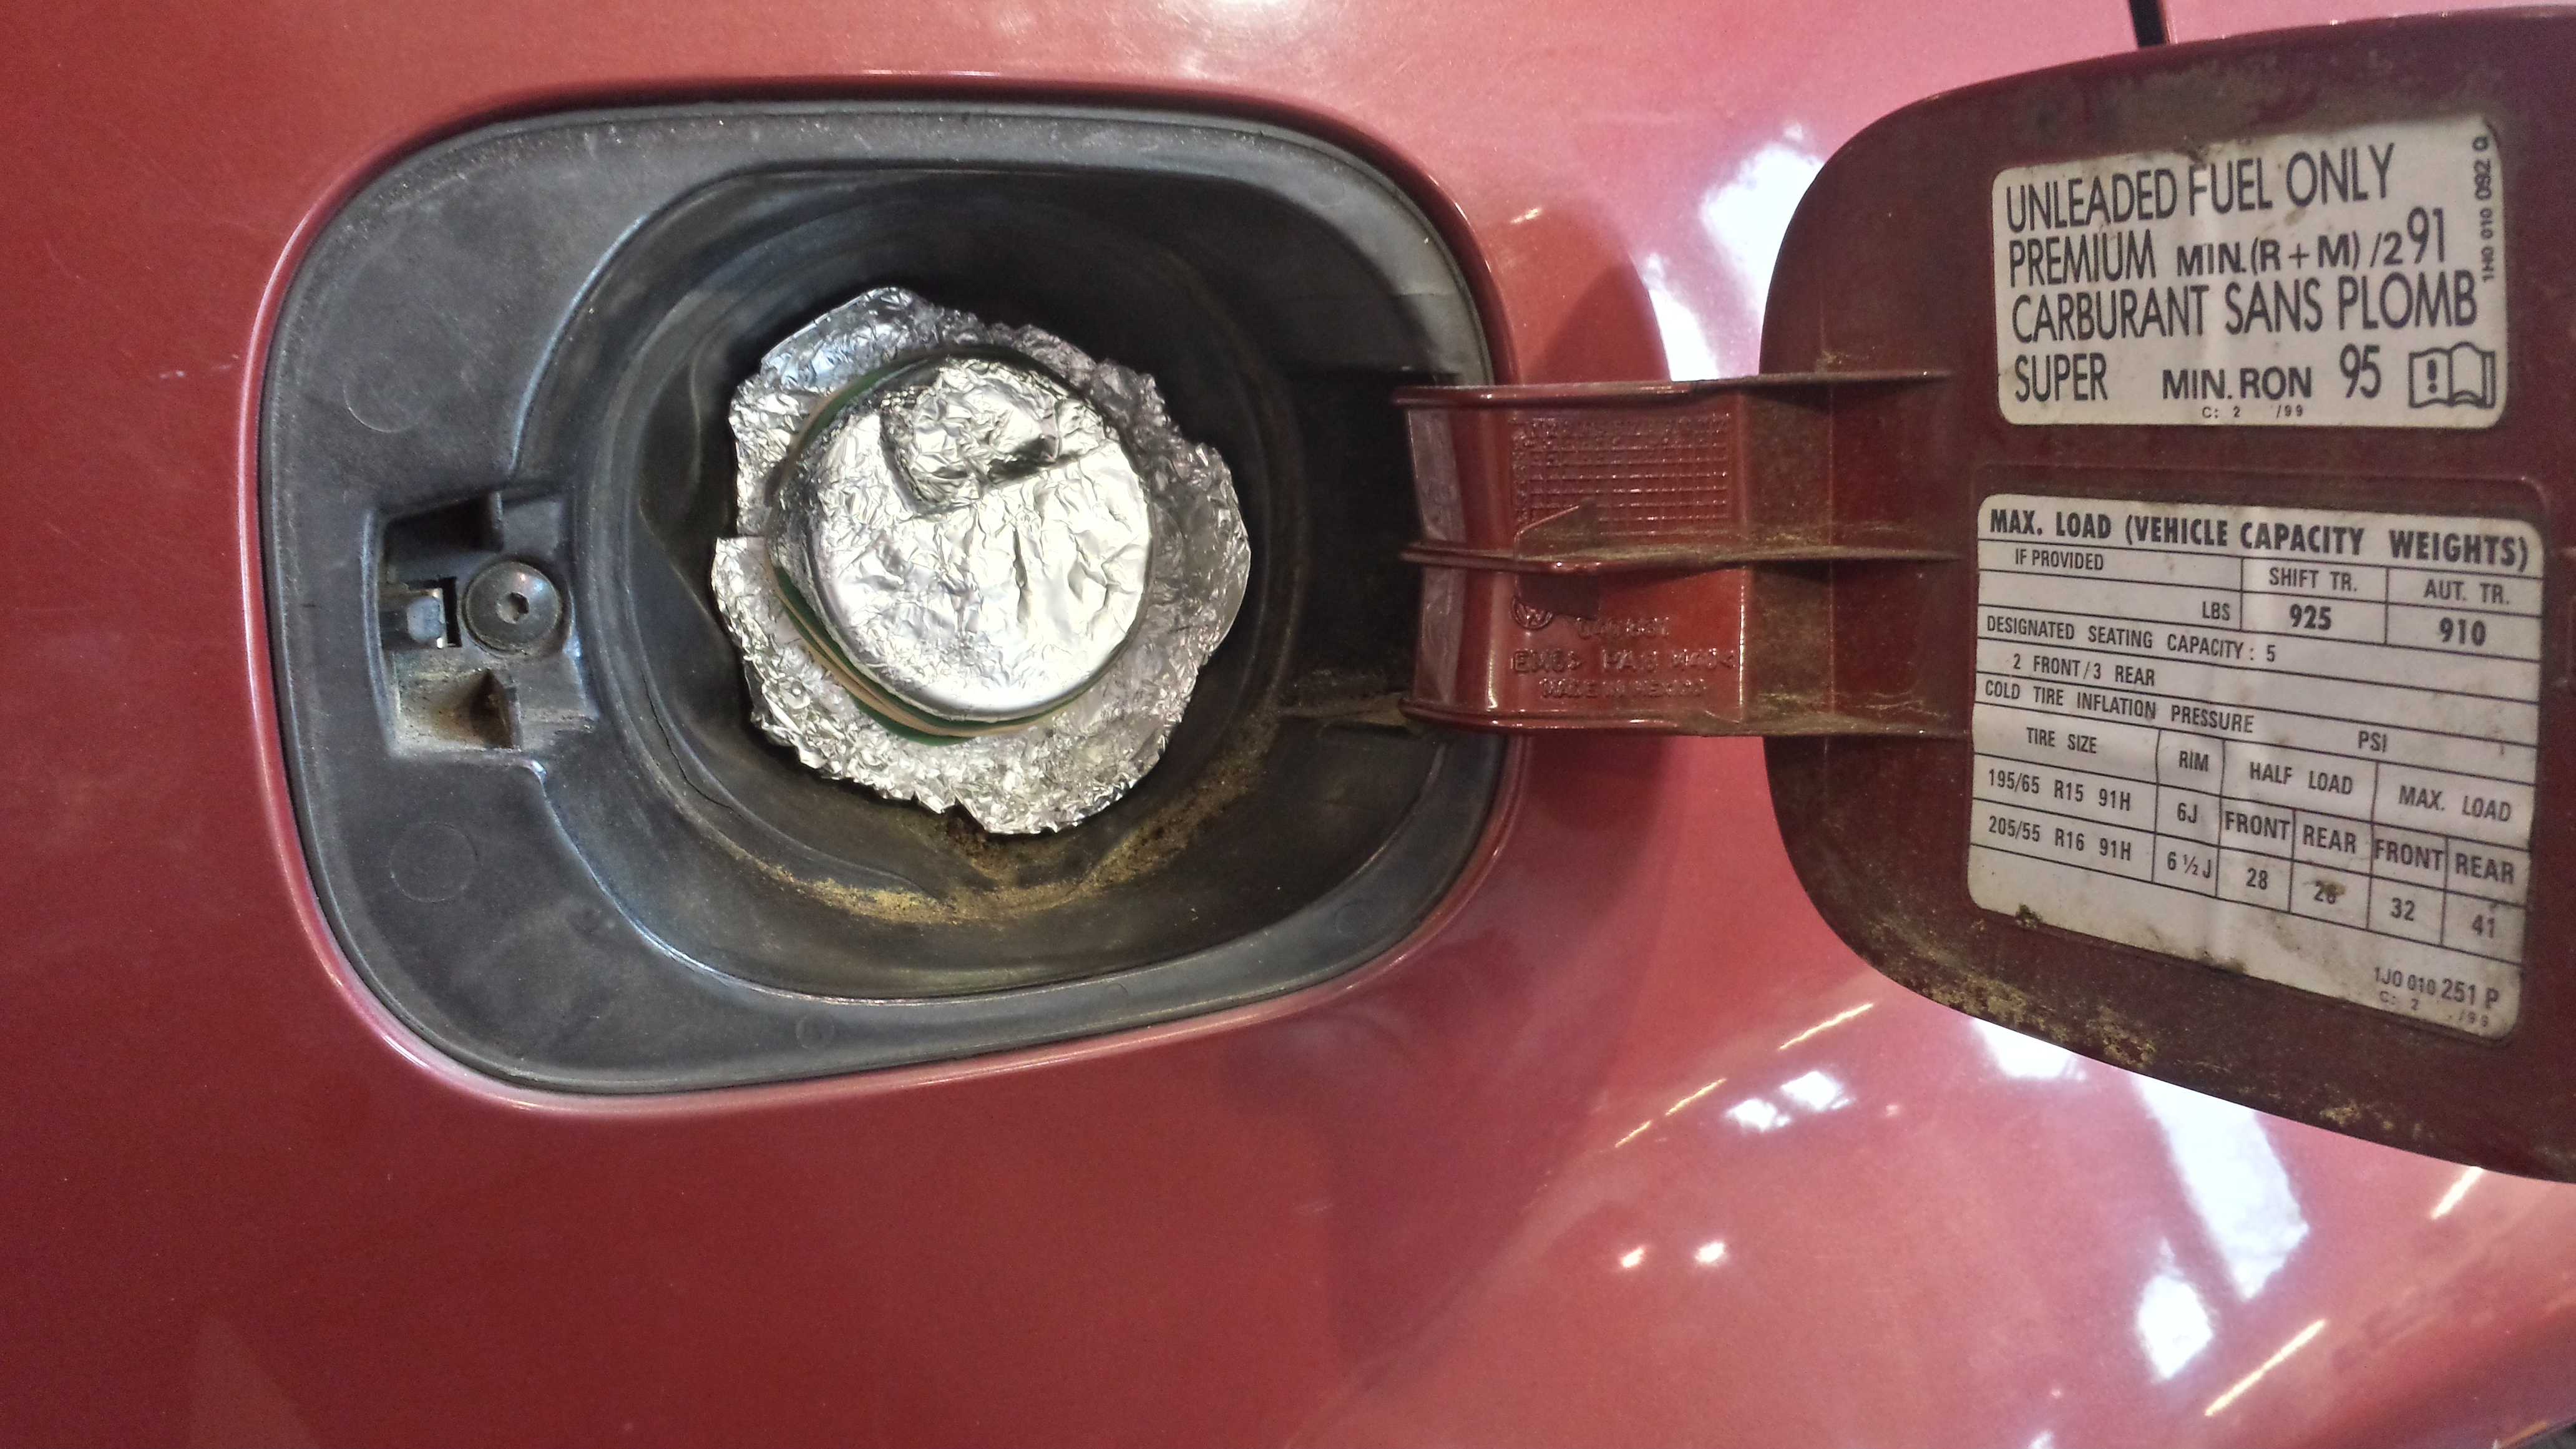
Bad VW gas CapThis might be one of my all time favorite Shop Shot picture of all time. This customer brought their car in for a minor service. On this service we add a fuel treatment. I was working on something else when I hear the tech next to me laughing. I walked over to see what was up, and this is what he found.

I guess the customer lost his gas cap. So until he got a new one, this was the solution, foil and rubber bands. Looking at it while I write this post, I am cracking up! Don’t worry, he bought a new gas cap. 😉

That does it for another Volume of Shop Shots! Remember if you have any car questions, just use this contact me form, post it to Facebook, or you can even call it in!

K&N Air filter

Hey everyone. Today I am traveling with my boss out to NASCAR Technical Institute in Charlotte,NC. We are planning to hire a few rookie techs. For me it’s about a two and a half hour road trip. I will also be taking a little detour to see some folks at a certain tuning shop in Charlotte, NC. For those of you that know what I mean 😉 more to follow.

As many of you know I am currently in the process of building of restoring a 1988 VW Cabriolet aka project “Luv A Dub”. Not only am I bringing this Cabby back to life, I am installing a freshly rebuilt VR6. This will take the horsepower from a weak 90hp to 172hp. That is a nice increase in power, especially from a ~2300lb car.

The awesome folks at AutoAnything.com asked me if K&N Air filterthey could help out with the project. As their name says, Auto Anything sells just about anything your car might need. We decided that putting a K&N air filter on the Cabby was the way to go.

If you are not familiar with K&N filters, they are a filter that never needs to be replaced. Instead of replacing the filter you can clean it. I will put some videos about cleaning a K&N filter at the bottom of the post. Not only are K&N filters reusable, they also let more air flow through than many disposable air filters. For all the stats on K&N filters check out their site KN Filters.

After We decided on going with K&N for the filter, Kelly from Auto Anything helped me pick the right filter for the Cabby. This was not your average task. This is a custom application. After some measuring on my end, and a few emails, they got me the exact filter I needed. Don’t worry, if you are replacing your factory size filter, getting the right one is much easier.

There is some controversy about using oil charged filters on VWs. I can tell you I have replaced tons of air flow sensors on cars with K&N filter. I have also replaced tons of air flow sensors with out K&N filters. Just like any part you use, you must make the choice on your own.

K&N Air filter

This is a close up of the filter element of the K&N filter.

if you have any questions, thoughts or comments about K&N filters, post them in the comments below. I will also tell you guys that I am also traveling on Wednesday and Thursday this week. Be sure to follow the Facebook page, Twitter, and Instagram. I will be posting picture from the road. One last thing. My wife and I had a chance to check out the Porsche By Design exhibit at the NC Art Museum. It was awesome! I posted a bunch of pictures on FB. When I get back, I will post more on the blog.

Purolator Oil Filter ReviewHey everyone. A few weeks ago I did a video about changing your own oil. The response has been huge. Because of the response, I thought I would follow up that video and write a little more information about changing your own oil.

Changing your cars oil is one of the easiest things to do yourself. That being said, a mistake here can be very costly. An oil change is one of the most important things you can do to keep your car’s engine happy. Be sure to follow the manufacturers recommended service interval. So before you dive into changing your own oil, let’s talk about some do’s and don’ts.

DO’s

  • Have a basic understanding of your car
  • Proper hand tools for your car
  • Have all the parts you need for the service. We will talk more about this later
  • Have a proper container to catch the oil
  • Be sure to have something to store the old oil.
  • Properly dispose of the oil, oil and filter.
  • Keep a record of the service

Don’ts

  • Be in a hurry
  • Cheap out of your parts
  • Forget to work safe
  • Put engine oil in the trash.

As you can see, there are plenty of things to keep in mind when doing your own oil change. Before we get into the steps to change your oil, let’s make sure we have all the right stuff.

Parts
It should come as no surprise, having the right oil, filter and washer is VITAL! You do not want to be the person that has to duct tape their oil filter back on. Yes, I have seen that happen. I talked a little about the differences in oil filters in the Purolator Review Post. Check that out for some filter features to consider. When it comes to oil, follow the manufacturer spec to the letter.  If you are not 100% sure about the oil you need, call your dealership’s parts department. They can tell you exactly what you need, and how much oil your car requires.

Tools
This will be highly vehicle specific. While I can’t list every tool to change oil, here are the parts you will need tools for:

  • Engine oil filter
  • Drain plug
  • Check your car for any cover that need to be removed. This may require more tools
  • Tools to remove the washer on the drain plug.
  • A funnel to add oil
  • Rags or towels for clean up
  • Drain bucket to collect oil
  • Your application may require some other special tools, especially if you drive a German car 😉

The Process
When I change oil, I have a very strict process I follow. It really is borderline OCD. You do not need to have such a strict process, but having a game plan is really important. Doing an oil change is also an opportunity to check the overall heath of your car. Here is my process for changing oil:

Damaged oil drain plug

Bad practices lead to destroyed oil pans

  1. Be sure you have ALL the parts to do the service. We don’t want to have to run out to the store during the service.
  2. Check the engine oil on level ground before you start.
  3. Raise the front of the car up. If you are using a floor jack, be sure to safely secure the car with jack stands. At home, I prefer the drive-on style ramps.
  4. Place the drain pan under the engine. Depending on how hot the engine is, the oil may “shoot out”. Be sure to place the pan accordingly. Also have your towels ready for any oil spills
  5. Allow the engine oil to drain for about 10 minutes. This will get most of the engine oil out. Remember, we are not in a hurry.
  6. Replace the washer on the drain plug, and properly tighten the drain plug.
  7. Remove the engine oil filter. Allow the oil to drain out of the filter.
  8. Before replacing the filter, put a thin film of oil on the filter.
  9. Properly tighten the filter.
  10. Replace any cover that you may had to remove.
  11. Lower your car on to level ground.
  12. Fill the engine with the recommended amount of engine oil.
  13. Double check the engine oil on the dipstick.
  14. Triple check the engine oil on the dipstick
  15. Start your car and let it run for about a minute.
  16. Shut the car off, and let it rest for 2-3 minutes.
  17. Recheck the engine oil level, and adjust as needed.
  18. Check and top off the coolant, power steering fluid, washer fluid, and transmission fluid(if applicable)
  19. Double check your work. Make sure there are no oil leaks!
  20. Record the service
  21. Be sure to properly dispose of the engine oil.

Well, congratulations, you have just crushed your own oil change. You might be thinking that 21 steps is a lot of work. But with the right tools, the right parts, and a little know how, you can to it. I really do want to stress buying top quality parts.

If you have any question about changing your oil, please post it up in the comments. You can also learn more about the history of the engine oil filter here.

Disclosure
I was paid by Purolator to review for this post with Burst Media, all thoughts and opinions are my own. All products were provided by Purolator; however are items I genuinely enjoy and feel are appropriate for my site.


I am a pretty big fan of people doing their own maintenance. I think it is important to understand at least the basics of the car they drive. All of that stuff goes out the window when DIY goes wrong.

We have talked before about DIY. There are several things that you need to consider when it comes to DIY verses paying someone to make a repair.

  • Price
  • Time
  • The proper tools
  • Know how

Those are just a few things you need to consider. You can read more about it at “Should you make a repair, or pay a mechanic?”

This is when a customer SHOULD NOT have done their own work. A mk4(1999.5-2005) Jetta was towed into the shop. I was not the one working on this car. I happened to catch one of the other techs pushing  a car in the shop. That is not really such a strange thing, but he was pushing it weird.

When I walked over to see what the heck he was doing, he told me the car had no brakes. I laughed and said “yeah right”. We got the car on the life, and sure enough, the car had no brake pads in the rear. With the wheel off, this is what we found

Failing VW rear brakes Yep, that confirmed it, no brake pads. The story that I got was, the customer tried to do a rear brake job. They took the brakes apart and even resurfaced the rotor. When it came time to reset the piston on the caliper, they realized they didn’t have the right tool.

On many modern cars, the rear caliper needs to be twisted back to reset. VWs are are the same way. There are ways to improvise the special tool. Before I knew anything about cars, I tackled the brakes on my Acura. I used a pair of pliers to twist the caliper back. It was a real pain in the butt, but it did the trick.

This is the back side of the caliper. The round part, piston, is what pushes the brake pad into the rotor. The piston is protected by a rubber boot. It keeps debris from getting into the caliper. As you can see this boot is ripped.

Let’s recap this DIY repair. If the customer would have brought their car to the dealer to have the pads replaced, and the rotors resurfaced, they would have paid about $270(that is just an estimate). Instead the customer paid

  • A bill to have the car towed to the shop
  • The time for us to pull the brakes apart and inspect the damage
  • Parts and labor to rebuild or replace the calipers.
  • Several days with out a car

This is a classic example of DIY not being worth it.

I hope that we can all learn something from this. I learned that trying to stop a car, even when pushing it, is really scary to try and stop.

I posted last week about upgrading the email service I use. That is currently on hold. There were a few things that I didn’t really like about the service I was going to use. I still plan on upgrading, it is just a matter of time. All that being said, make sure you are on the email list. I don’t spam or sell the information. That would be lame!