deutsche auto parts logo

Up next in the How To series with Deutsche Auto Parts is, replacing a VW Intake manifold and fuel injector. This is a great video that will teach you everything you need to know about replacing a bad intake manifold, or fuel injector. Also if you plan on inspecting your Volkswagen for carbon build up, this video shows you what to look for.

If you are not replacing either a intake or injector, skip to about 20 minutes to see what carbon build up on the intake valves looks like. You can also skip to about 27 minutes and see what a clogged fuel injector looks like.

Thanks again to the boys at Deutsche Auto Parts for having me out. Be sure to subscribe to their YouTube channel and follow them on Facebook. Be on the lookout for more VW how to videos from Humble Mechanic and Deutsche Auto Parts

deutsche auto parts logo

As I mentioned in Shop Shots, I had the pleasure of doing some video work with the Boys at Deutsche Auto Parts. This is the DIY video on replacing a High Pressure Fuel Pump (HPFP) on a 2.0t. This is the first a many videos that we teamed up on. If you have any questions about this DIY, please post them in the comments below.

Be sure to check out all the VW DIY videos by Deutsche Auto Parts on their site, or the Deutsche Auto Parts YouTube channel. For those of you don’t know, Deutsche Auto Parts is an amazing resource for VW parts. Whether you are looking for maintenance parts, repair parts, or unique and performance, check out my buddies at Deutsche Auto Parts.

Thanks for watching, head on over to YouTube and subscribe to the Deutsche Auto Parts channel. They are doing great things over there.

Flashlight and Magnet

Flashlight and Magnet

You guys may know that I am a big time flashlight guy. I carry one with me where ever I go. So when the folks at HAYDEN Industrial Supply asked me to do a tool review for them, I jumped on the chance. One thing to remember about my reviews. These are my opinions based on experience.

Today we have the Catspaw Flexible Light and Pickup Tool. It combines 2 things I use all the time, a flashlight and a magnetic pick up tool. It is a pretty cool idea, but it can withstand the abuse I put flashlights through. Normally I like to give a tool a few weeks of real world use. In this case that was not really necessary.

About the tool
Like I said, the light is a great concept. It houses 3 LEDs, has a magnetic ring, and telescopes up to about 22.5 inches. It is a really cool orangey/copper finish that seems to hold up well. The button for turning the light on has both a hard on/off and a momentary on. That means you can just slightly push and hold the button and the light will stay on while you hold the button.

The Light
Right out of the gate I didn’t have good luck with the light. The battery pack was finicky and took some adjustment to get set properly. Once I got the batteries set, I found the light to be nice and bright. I did find the button to function rather poor. even a slight touch would turn the light off. As I sit here writing this, I still have to fiddle with the button to get the light to come on.

The Magnetstrong magnet
The magnet pickup is very strong. I was able to pick up and hold 4 sockets. That is much stronger than most pickup tools. The fact that the light extends out makes the magnetic pickup even better. The bad part about a strong magnet, it catches on everything metal. This causes the button to get pressed unintentionally.

Overall
I think this tool is a “C-” at best. The light is finicky and inconsistent. It can be the brightest light, but what good is that when it will not turn on. It also uses little watch type batteries. That is not practical for changing batteries. Plus the overall size of the light makes it too big for carrying on your person. For me this tool does not fit the bill.

This may have been one of the more harsh reviews I have done. But I owe it to you all to give you my honest thoughts about a product.

One more thing
The folks at Hayden were awesome and gave me a coupon code to pass on to you guys. Head on over to Haydenhasit.com and use the coupon code “humble-hayden” for 10% off your order of $25 or more. But hurry up because this code will expire 8/24/14

Juan Pablo Montya

While at the Grand Prix of Houston, I was able to sit in on a round table chat with race car driver Juan Pablo Montoya. He has been all around the racing world including Indy, F1 and Nascar. We get to her him talk about cars, both racing and personal, driving, and some amazingly awesome life advice.

Oh, and 2 of the guys asking questions are none other than Eric the Car Guy, and Jason from Engineering Explained!

Some really great stuff from Juan. It is great to see someone open up and drop some unexpected live advice on you.

Also Thanks to the folks at Shell. This trip to Houston was sponsored and hosted by Shell.

Grand Prix OF Houston

Grand Prix OF Houston

Happy Monday everyone. I have something big to talk about today. It is going to make for a crazy/fun/busy week for me. I am looking forward to sharing it with all of you.

A few weeks ago I got invited to Houston, TX. The folks at Shell US invited me down to the Shell Technology Center Houston(STCH). We are going on a tour of the STCH. We will be doing several different workshops including:

  • Burning valves showcase
  • Inside an Engine
  • a tour of the Analytical lab(AWESOME)
  • Fuel blend overview
  • and more!

All of that is just day one stuff! Day 2 will be held at the NRG Center. This will be more of a media event, with roundtable Q&A with

  • Juan Pablo Montoya
  • Tim Cindric
  • Chris Hayek
  • Richard Dixon

After 2 days of really cool behind the scenes Shell tech, it’s race time! I will be spending the next 3 days at The Grand Prix Houston! 3 days of racing, heck yeah!

So what does this mean for you?
Well, I will be at a gas/oil place. So if you have ever had any questions, POST IN THE COMMENTS! I will get some answers for ya. I should also be able to get some sweet behind the scenes pictures for you guys.

If there was ever a time to follow on social media sites, this is it. I will be updating the blog as best I can, but I will be posting pictures all week on Facebook, Twitter and Instagram. I will also try to get as much video as I can and post it to YouTube. I have links on the right side of the blog.

To say that I am excited doesn’t even come close. Get ready, this is going to be a fun week. Remember if you have any questions, post them in the comments of this blog post. Oh, if any of you are going, let me know. I’d love to say hi at the race.

Useful info
Grand Prix of HoustonShell Tech Center
Pennzoil
Shell

Statement of Disclosure
This trip was sponsored and hosted by the folks at Shell.

Auto Mechanic

Happy Monday everyone. Something happened this weekend, that totally blew me away. The blog had it’s 3rd birthday. Oh how time flies when you are having fun. So today I want to talk about how I got started, and maybe the future of the site.

I had been thinking about starting a blog for while. I got the final push after being frustrated with the way my dealer handled our internet presence. It all worked out of the best. You can read the entire story here. With the help of some You Tube videos and some very talented friends of mine, Humble Mechanic was born.

When I first started the blog I wanted to share a little mk1 VR6 Cabbyabout what an auto mechanic does day to day. Some of the crazy things we see. I also wanted to help folks learn about their cars to avoid getting ripped off. From early on I also wanted to add a project car to the mix. The amount of cool stuff I could share with a project car is almost endless. I have a separate section at the top just click on “Luv A Dub” and you can see the project from day one.

There have been some pretty cool successes(even though I am far from retiring and doing this blog full time 😉 ). I have been able to meet some ultra awesome people. I have had the pleasure of doing a lot of really fun product reviews and giveaways. Those are some of my favorite things to do. I also have a really cool announcement coming at the end of the week. I think you guys are going to be really excited about.

So where do we go from here? There is no way we can not stop all crook mechanics in the world. So we will have to take a different approach. That means keep teaching folks about their cars. Walking folks through the diagnostic process to find the cause of their car’s issues. I am also working on a really cool program that will help you become a permanent part of this community. But more on that later.

So as I finish up, I just want to say a huge heartfelt THANK YOU to each and every one of you. If it was not for you guys there would be no Humble Mechanic. We have come a long was from that crappy first blog post I wrote 3 years ago. There are big things that are going to be happening in the second half of 2014. I am thankful to have you all along for the ride!

Cheers
Charles

One last thing, if you want  a good laugh, check out some of my first posts. YIKES! 🙂


VWheritage

VWheritageI got something a little different for you guys today. A special edition of Shop Shots, well sort of. The folks at VW Heritage contacted me a while back. Their shop flooded. We talked about giving folks some tips on dealing with flooding. So take it away Tara.

According to statistics the winter of 2013/2014 has been the wettest in the UK since 1910.  Extreme weather,  storms and heavy rain are on the rise globally with the threat of climate change, and predicted to increase in the US as well.

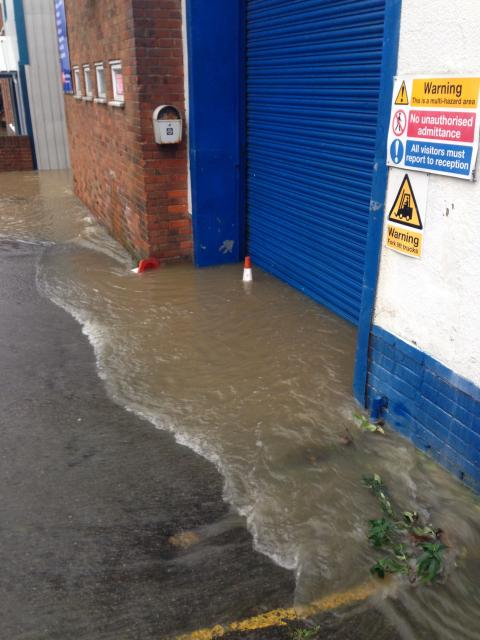
VW Heritage, a car firm based in the south of England, got a taste of this first hand recently when their UK workshop was flooded on New Year’s day: In the weeks leading up to New Year 2014 our home county of Sussex saw some of the heaviest rainfall in decades.

Our mechanic, Ben, got a call from the alarm company on New Year’s day because the movement of water flooding into the garage had triggered the motion sensors.   He arrived to discover 2 feet of water filling the workshop.

Water had been gushing from the flooded road nearby and down the ramp, straight into our unit, where Ben’s Mk1 Jetta Coupe build project and the boss’s rather special Mk 1 Golf were both stored.

Fortunately, the Golf kept the water out, apart from some soggy carpet, and we’d put the TDI engine and box up on the crane, out of harms reach – but the boot of the Jetta did get a little damp. We also lost some electrical tools, a welder, the heater and all the stuff that was on the floor, or stored low down.

Looking on the bright side, we got away lightly in comparison to the National Corvette Museum sink hole disaster recently in Kentucky. Plus, we get to share the lessons we’ve learned from our experience with others:

VWheritage

Top tips to prepare your garage for a flood

  • Re-assess what you keep on lower level shelving, on the floor and in the bottom of your toolbox. Big toolboxes have great storage for drills, and other electrical items that you rely on day to day.  Sadly water levels rise up, and these tools will be the first to get wet,  along with the heavy welder you leave on the floor, and the heater that takes the chill out the air.  If you can’t keep these items permanently stored  a few feet off the ground, then at least move them temporarily if there is any threat of heavy rainfall or flooding.
  •  Make sure drains nearby are kept clear, remove any debris, leaves, and blockages. Not a very pleasant job,  but you’ll be saving yourself an even nastier one later –   cleaning up afterwards is pretty gross!
  • Seal interior walls with waterproofing compounds and paints – they can’t keep water out but they can stop it seeping through and creating more damage. For timber use a wood preservative protective coating.
  • Shallow floods penetrate weak points in the building such as air vents and cracks in brickwork.  Check the building both inside and out for cracks and holes,  and then plaster or use filler or water-proofing sealant. Regular maintenance will limit the amount of water that can seep through masonry walls. Water-resistant coatings applied to porous surfaces will also fill any cracks in the masonry or the joints. To avoid trapping water in the wall purchase coatings that are micro-porous so that the wall can breathe.
  • A water proofing epoxy or hard wearing waterproof paint on masonry or concrete floors will minimize damage and make it easier to mop out water if it does come in.  Depending on your existing floor, you may need to prepare the surface before applying. There are a number of decent tutorials and lots of advice online.
  • Consider installing a hoist or mini crane to allow you to store valuable, easily damaged parts above ground or in the apex of a workshop roofspace.
  • Installing breaker sockets will ensure that if water gets into any electrical kit it switches the socket off rather than shorting out.
  • It sounds obvious but if it’s been raining heavily, keep tuned in to local news and weather stations, especially if you’re in an area that’s liable to flooding.  Severe weather and flood warnings will be issued in advance of predicted flooding.
  • A water proofing epoxy or hard wearing waterproof paint on masonry or concrete floors will minimise damage and make it easier to mop out water if it does come in.  Depending on your existing floor, you may need to prepare the surface before applying. There are a number of decent tutorials and lots of advice online.
  • If you think flooding is imminent, place sandbags around doors and entrances, you can contact local builders’ merchants for stocks of bags and sand. The use of flood barriers like this will only delay the penetration of water but at least you can buy yourself some time and move all your tools and valuables out or off the floor.

VWheritage

Tara Gould works for VWheritage (http://www.vwheritage.com/) who offer genuine and top quality classic VW parts for restoration and repair.