Tag Archive for: MK1

MK3 VR6t UPDATE and MK1 VR6 Swap Update

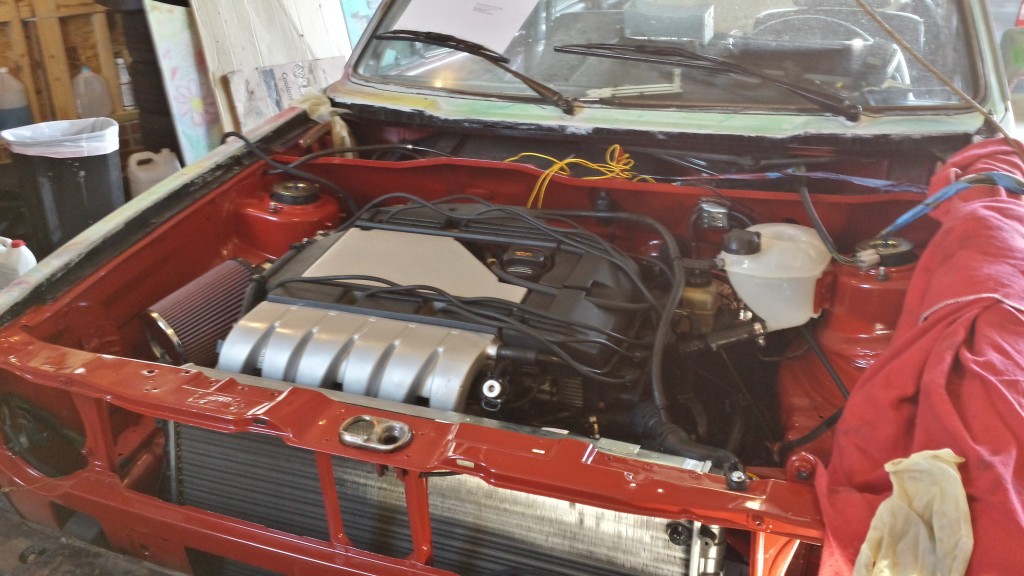
Today I am trying something a little different. You are getting 2 videos in one. I made a video on the MK3 VR6t, updating where we are in the build. We also talk about what the next few jobs are, and why the project stalled. I also had the chance to catch up with my old MK1 VR6 Cabriolet. You guys that have been around for a long time may remember the Luv a Dub project! Since we are checking out both today, I figured I would make one post about both cars.


Become A CrewMember
If you like this show. If you get value out of the videos and content that I put out, consider supporting the show by becoming a CrewMember. You will get discounts you can’t get anywhere else, exclusive videos from me, and VW/Audi training manuals. Between the discounts and the training manuals, the CrewMembership can easily pay for itself. Become a CrewMember today

Help Support The Show
Many of you have asked about supporting the show. For that I thank you. For now, the best things you can do are SHARE THE SHOW, and shop with my links on Amazon. You will not spend any more money that you would normally. Here is the Amazon link Humble Mechanic on Amazon or you can check out some recommended tools I have listed below.

Important links:

As always I love to hear your thoughts. Please post them in the comments section below. Again, if you have any questions, email me Charles(at)humblemechanic(dot)com with Question for Charles in the subject. Also if you have an idea for a show, contact me via email, or use the contact me form!

Don’t forget to follow me at:

Humble Mechanic automotive Podcast

MK! VR6 Volkswagen engine swap DIY

MK! VR6 Volkswagen engine swap DIY

Hi folks! I hope that you all had a great weekend. I had a productive Sunday working on the Cabby. I will  tell you all about it. First I have a couple of things to let you guys know.

Dubs For A Cause.
I have mentioned it before, but the show is coming up quick. If you plan to make the show PLEASE let me know. I always like meeting you guys. Plus this show is for charity. It does not get much better.

Travel last week
I spent a bunch of time in the car last week. Tuesday my boss and I drove to Charlotte, NC. We went to a job fair at NASCAR Technical Institute. I spent the day chatting with about 100 future technicians. It was a very cool/strange/fun event. I also snuck down to Euro-Wise, but more on that in a minute. My wife and I also took a mini vacation to Asheville,NC. We were only there for a day, but we had a blast as always.

Travel this week
This week I will also be doing some traveling. I will be in training for the better part of the week. It is about a 5 hour drive there, and a 7 hour drive back. Thank you DC traffic. The class is some type of diagnostic training. I don’t have much more info than that. I will do a post about it and fill y’all in on the details.

A little help
With my traveling this week, I have a chance to record a few podcasts. I just need some help from you guys. What do you want us to talk about? I have a few ideas, but I need some help. Post your ideas in the comments below. Here is what I am thinking

  • Winter Car preps. It may be a little late for some of you, but this is very important.
  • Mechanic training. Since I will be going to training, this makes sense
  • Tools. I am thinking specifically about tool costs, what techs need to start with, and some differences between pro level tools and average consumer tools

Alright, we have all that wrapped up, let’s talk Luv A Dub!

MK! VR6 Volkswagen engine swap DIYWhile the VR6 base engine has been installed in the Cabby for a while, I just installed all the “accessories”. That means I installed the following:

  • upper intake manifold
  • air intake with sensor and K&N filter
  • Radiator
  • Header
  • Exhaust
  • A full exhaust, thanks to boys at Euro-Wise!

I also finally hooked up all the coolant lines, and electrical connectors. We are very close to having a running car.

MK! VR6 Volkswagen engine swap DIYHere is another engine bay shot. Once I have the car properly running, I will clean up the wiring that is just throw in the bay. I want to make sure everything runs properly before I do the final fit of the wires. Plus the painted part of the engine cover is at work. 😉

MK! VR6 Volkswagen engine swap DIYMuch like the engine, the interior has come along way. But also has a little ways to go. I still have to swap the lower dash cover, all the door cards, the center console, and the rear seats. Plus add all the little things like ashtray and vents in the dash.

Well that is where we are at with the Cabby. It has been a long long road. I am hoping to have the exhaust part welded today. If that is the case, I should have her running today. Don’t worry, I will shoot a ton of video of her first start. I hope it all goes well.

mk1 VR6 Cabriolet VR6

Engine bay before paint

Last week I polled the audience about painting the engine bay of the Cabby to prep it for the VR6. A simple factory Tornado Red! I was able to get a slight discount on some professionally mixed paint and the hardener. Let me just say, automotive paint is freaking expensive.

When I bought my air compressor a few years ago, it came with a paint gun. Like a lot of things that come in a set, I am sure this is the cheapest paint gun ever. I am painting the engine bay so it does not have to be professional grade, but I still wanted it to look nice. I got my paint and gun, and was ready to paint, or so I thought. I was missing the fitting to hook the gun to the air hose. A quick trip to Auto Zone, and I was back in business.

I mixed the paint and chemical hardener, and started to paint. I quickly realized that getting the paintspray pattern right is an art. The painting went something like this:

mk1 VR6 Cabriolet VR6

The result of poor spraying skills

  • Spray paint, globs of paint come out of the gun.
  • Adjust the pressure on the compressor
  • Spray paint, slightly less globs, but still too much paint
  • Adjust the pressure on the compressor
  • Spray paint, almost right
  • Adjust the pressure on the compressor
  • Spray paint, FINALLY I got it right
  • Run out of paint. :/

By the time I got the spray right, and the hang of the paint sweep, I ran out of paint. I am pretty sure that paint should have been more than enough to cover the engine bay. The engine bay was now splotchy with red, and missing paint in some spots. Like I had said, it’s the engine bay. It does not need to look perfect, but this looked awful.

After some mulling around(aka being mad about the poor job I did) I decided to head back to the auto parts store and pick up some rattle can spray paint. I was able to even out almost all the paint with the rattle cans. Unlike using an air powered paint gun, I can spray paint pretty well. Overall it came out pretty good. I have a few paint drips that need to be sanded and cleaned up. The red rattle can color is not an exact factory match, but it’s close.

So what is the next step? Well I should be bolting the engine in this weekend. After the engine is bolted in, it’s baby steps to get the car running. I was thinking that it may be fun to do a little contest. The sweet prize will be bragging rights. Post in the comments the date you think will be the first start up of the engine. My guess is August 16th. What do you think?

You can also go back and check out all of the progress we have made over the last year at Luv-A-Dub. Or click the tab at the top of the page.

mk1 VR6 Cabriolet VR6

After the respray

Mk1 VW VR6 Cabriolet

It has basically been forever since I have done a post about the VW Cabby. Today I want to give you all some updates and show ya some pictures of how the Cabby sits right now. I have owned that Cabby for just over a year now. All things considered I am pretty happy with the progress. I am hoping to have her one the road before the end of summer. Should we all take bets on whether that will happen or not? LOL 😀

The VR6 Build
The rebuild of the VR6 engine is almost complete. The long block(engine block and cylinder head) are built. Most of the accessories are installed. The water pump is the only thing that needs to be installed before the engine goes in the Cabby. The transmission is all painted up. I still need to paint the axle flanges, and install new axle flange seals. I am thinking by Saturday the engine and transmission will be bolted together. THAT is exciting.

Stripped MK1 Cabriolet engine bay

Working on getting the engine bay ready

The Cabby Engine Bay
This is what I have been working on the last few nights. Cleaning, sanding, cleaning, cleaning and then more cleaning. There is an amazing amount of dirt and grime that sticks to the engine bay of a car. I have no intention of doing the “shaved bay” thing that many other are doing. I think that is a really cool thing to do. I would just like to drive my car some time this decade.


The Interior
I can sum up the interior of the car in 1 word, DISASTER! The interior is pretty much stripped. I wanted to be sure I could run the new wiring neatly. Plus I wanted to remove the last of the sound dampener from behind the dash.

What is left?
When I start to think about all the things left to do, it gets overwhelming. Here is a quick list of things I still need to do or to get:

  • Have the ECM tuned
  • Get a suspension setup
  • Wheels and tires
  • Pick up a battery box, for the trunk
  • Exhaust including header
  • Spark plugs
  • Radiator and fans
  • Pressure line for the power steering pump
  • Serpentine belt
  • Wiring, wiring, wiring, wiring and probably a little more wiring

I am sure that I have many more things that I am forgetting. I am learning that the key to staying motivated during a build like this is to celebrate the small victories. Getting the engine bolted into the car will be my biggest victory yet!

Well, that is where we stand with the Cabby! You can check out all the Luv-A-Dub progress at MK1 VR6 Cabriolet. Also a big shout out to Justin at GermanAutoParts.com and Mike and the boys over at EuroWise!


MK1 VR6 Transmission mount

I thought I would shot a quick review video to follow up the blog post I did about the Mk1 Vr6 conversion kit from Eurowise. You can read that post here. This kit is designed as a bolt in solution for installing a VR6 engine into a Mk1 Volkswagen.

Thank you for watching. You can subscribe to all the videos on YouTube by clicking the icon on the right.