Follow the progress of the 1988 Volkswagen Cabriolet. See how transforms from a chalk covered mess, to a sweet ride

Tag Archive for: Luv A Dub

Shell at the USA F1 Grand Prix

Happy Friday everyone! Today’s show is a multi-part show. It has been a while since I just had a chat with you guys. Since things are finally getting back to normal, I thought it would be fun to give you a recap of my F1 and Shell trip. It has also been a long time since we have talked about the Cabby.

Today’s Automotive Podcast we discuss:

  • My trip to Austin with Shell
  • The great folks in my media group
  • A weekend with Ferrari
  • Dubs for A Cause
  • VR6 Cabby electrical issues (big surprise)
  • How we are going to fix said electrical issues
  • and more

Links from the video:

As always, your comments and questions are not only welcome, but encouraged. I love hearing from you guys. If you have a topic you would like discussed on the show, you can post that in the comments below, use the contact me form, or fire me an email to Charles(AT)HumbleMechanic(DOT)com. Be sure to check out and follow at:

MK1 VR6 VW Cabriolet

Hey everyone,

I posted a video of the Cabby a few weeks ago. It was pretty weak. So I thought I would post another test drive video. This one really gives a better feel of what it is like to drive this car. Plus the exhaust note is freaking awesome. Oh and be sure to watch until the end 😉

I am working on a guide for this sway. Some of the things that I ran into during the build. The ways that I tackled a few issues. It is still in the early stages but be on the look out for that soon.

Don’t miss Shop Shots tomorrow!

VW cabby with top removed
MK1 Crossmember Reinforcement Bar

This is the brace I installed from Euro-wise. I HIGHLY recommend this!

Happy Monday everyone! I hope that you all had a great weekend. One quick thing before we get into why I never throw away parts. I have been having email issues lately. Not sure what the deal is, but the folks at HostGator are working on it. If you have emailed me in the last few days, and not heard back, please resend it. I forwarded my email to another email. Sorry for any troubles.

Alright, like the title says, I never throw away parts. Even things that I don’t think I will ever need. Something happened Saturday that validated my crazy hording of VW parts. I sometimes think that I will clean house and get rid of things. Sadly I don’t think it will ever happen. On that note, if you need any VW parts let me know 😉

On Saturday I drove the Cabby Luv-A-Dub to work. My plan was to install a front brace, and remove the convertible top. The shop was pretty busy all day, so got a late start. The install of the brace was a little more work than I wanted to do. I had to remove the front engine mount and move some wiring out of the way. It was one of those jobs you think will be quick, but doesn’t really work out that way.

The excitement didn’t really start until I was finishing up the job. With the brace installed, I wanted to start the Cabby up to let it warm up a little. I hit the key and got crank crank crank crank crank, but no start. Dang, let’s try it again, crank crank crank crank, no start. It was clear at this point that something was not right. When ever this type of thing happens, step 1 is recheck your work.

I did a quick visual inspection of the brace and the area I was working in. Nothing stood out as an issue. I did have the power junction disconnected, but that could not be the issue. I could also hear the fuel pump running when I was trying to start the car. At this point I am starting to get annoyed. I just wanted to go drive!

I grabbed my laptop to check for fault codes. I have to say, having OBD2 in the Cabby is pretty awesome. Sadly, it was no help. I had fault codes stored, but that was due to several sensors that I didn’t use with the swap. In diagnosing a no start concern, this is the time to pick a path and go. You only NEED 3 things for a engine to run

  1. Compression new this was good. I drove the car in the shop. Plus you can usually hear when an engine has really low/no compression
  2. Fuel
    I knew the pump was running, but not sure about the engine getting fuel. This would have been a good next step.
  3. Spark
    This would have also been a good check.
  4. ECMI know I said you only need 3 things, but the ECM is vital. It controls spark and fuel, and it wont give you that if it doesn’t see what it wants to see.

Before I started taking fuel lines off, and checking for spark, I decided to go back over my work one more time. I raised the car up and did another visual inspection. DANG IT, didn’t see anything. After seeing nothing again, I did one of my top secret diagnostic techniques.

Mess with stuff until you find something.

I started giving all the wiring harnesses a tug. I barely touched the harness for the crankshaft position sensor when I heard a beeping and buzzing. YES, now we are on the right path, it was also lucky that I left the ignition on 😉 Now that I had something to go on, it was time to fix it.

I disconnected the sensor, checked the pins and connection. They were all good. I found that if I touched the harness on the sensor side, that beeping and buzzing would start again. I tweaked the harness so that the beep was constant.Side note, I am still not sure what was beeping. With the harness tweaked, the car would start.

VW cabby with top removed

I LOVE how the cabby looks with the top removed

The harness for the crankshaft sensor is sealed. That means it should not be repaired, but replaced. I dug through a box of parts I set a side to bring home. Wouldn’t ya know, there was a replacement crankshaft sensor! I replaced the sensor, and BOOM she fired right up.

So the moral of the story is, cars  break. It is never a bad idea to have a few extra parts laying around. I am that guy in the shop that everyone comes to when they need a part. Having this sensor saved me over $100 and my wife from having to come pick me up at work. I am happy to be a lucky auto mechanic.

MK1 VR6 Engine swap

wpid-IMG_20131119_132559.jpgHappy Tuesday everyone. Today I wanted to update you guys on the progress of the Cabby. There are a ton of you that have been following the progress of this build from day one. I really appreciate that. It has been a long journey over the last year and a half. If you are a newer reader, you travel back and check out the cabby before we started the build.
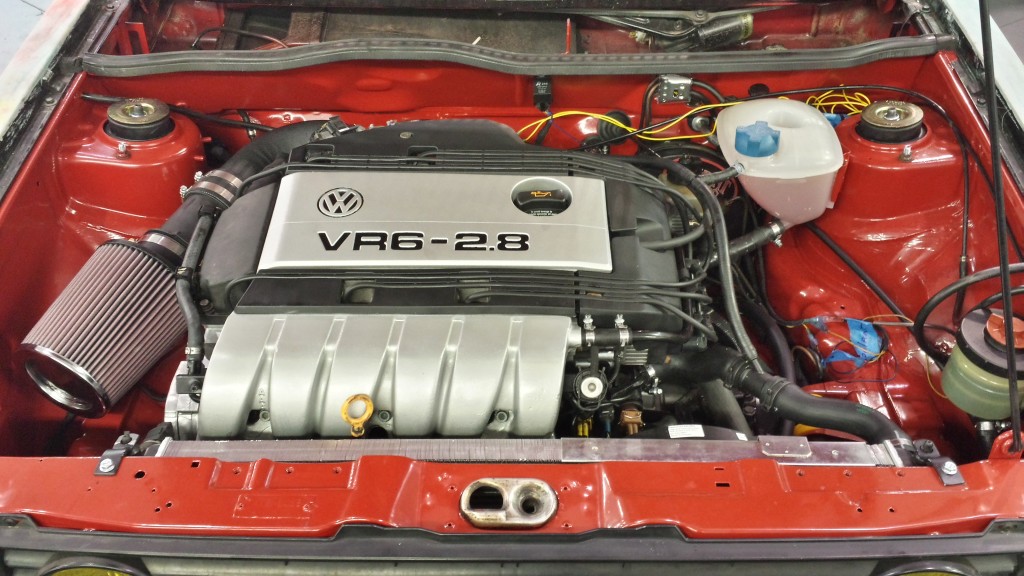
Where the project is now.
The Cabby is sitting in the garage as I type this. The car ran and drove great. That is until the last time I drove it. I picked the car up from work on Thanksgiving. She made it almost all the way home. I hit the throttle, and started to smell raw fuel. I pulled over to find that the car was pouring fuel on the ground. It looks like a fuel line swelled and started leaking. It should be a simple repair. I am hoping to get that fixed this weekend.

What is left to finish?
The Vr6 is in and runs really well. It is always stressful rebuilding an engine, then having it sit for 6 months before starting it. So I am happy she runs. There are still a ton of things that need to be finished.

  • Interior
    The interior is coming along, just a little slow. If you remember, I picked up a 1984 Cabby a few months ago. I used most that that interior in the chalk cabby. I still have to install the rear seats, door panels, and small parts of the dash. It is about a days worth of work.
  • Exterior
    I don’t even know where to start. For now, I think she is going to stay the way she is. What do you guys think? Post up any ideas in the comments.
  • Electrical
    So far, everything seems to work well. I have some lights to hook up. I also plan to control the headlights with relays. This will help to brighten up the lights. I have also considered making the inner lights on the front driving lights instead of high beams.
  • Engine
    While the engine runs great, there is still a number of things that need to be finished. Some of the wiring harness needs to be trimmed up and wrapped. I also need to have an Oxygen sensor port welded in the exhaust. I also want to change the radiator. I used a 1991 Passat 16v rad. I think I am going to swap it for a VR6 rad. It seems like it will fit better. I am sure there are other things that need to be cleaned up. We will cross that bridge when we get there.

MK1 VR6 Engine swap

Plans for the future
To be honest, I have not given a ton of thought here. For me, I need to focus on the next hurdle. It is easy to get overwhelmed looking too far ahead. Once the car is back together, that is where things get interesting. Reliability is my main focus. I want to be able to take a 4 hour road trip and not worry about getting there. I hope by spring it will get there. There are also a few random things I am thinking about. What do you guys think about this?

  • Having the car wrapped. It would be cheaper and easier than paint
  • Removing the top and a Roadster style ride
  • Add some support to stiffen the car up

Well, that is pretty much where she sits. I am also working on a guide to some of the things I did with the engine swap, that might be a little different. If you are working on this swap, let me know. I will be  more than happy to help if I can.

SHOUT OUTS!
There have been several folks that have helped me during this build. They have supplied parts, advice, and other cool stuff. This is in no particular order
EURO-WISE ~ VR6 install kit, exhaust, front brace(just ordered that) Everyone there is awesome!
German Auto Parts ~  maintenance parts, I HIGHLY recommend these guys. Tel Justin I sent ya
Black Forest Ind. ~ JOM coil overs.
Anything Auto ~ K&N air filter
42 Draft Design ~ Intake
T-Hoff ~ They did the machine work on the engine
Nothing Leaves Stock

One more thing. I shared this on the Facebook page, but I wanted to post it here. Most of you know that I am a big craft beer fan. There is a new brewery that is opening up in Rural NC. They started a Kickstarter to get the final funding to open the doors. Haw Rives Ales Kickstarter. If you can help them out, that would be awesome. If you do, let me know. I got something extra for you. Just contact me.


MK1 Vr6 Rabbit Cabriolet

MK1 Vr6 Rabbit CabrioletIt is time for a Cabby update. For those of you that may be new to the blog, let me do a little recap about this Cabby. In April 2012 my dealer purchased a 1988 VW Cabriolet. The purchased it and donated it for a local charity event. They painted it with chalk paint, and put stickers all over the interior. After the event, I bought the car. I really wish I could have got the car before the event, but it was for charity.

Once I purchased it, my goal was to get everything back to stock. I started with the interior. Hours of laboring trying to get all the stickers off. It didn’t take long to realize most of those stickers were not coming off. I turned my focus to rust treatment, and sound dampening. At first I had no intention of doing an engine swap. The plan was to get the 1.8 running better and just rock that. Well, I stumbled across a 1998 Jetta with a VR6. The bad part is the engine had a blown head gasket. I stripped the car, sold much of the parts, and send it to the scrap yard. The poor Jetta had a rough life. I actually picked up another VR6 with a manual trans. I rebuilt that engine, and now the MK1 Cabby has a 6 cylinder engine in it.

Where we are now
The cabby is slowly coming back together. Last weekend I spent some time putting the interior back together. I also attempted to crank the engine. It turns out that the wire on the starter was broken. I was able to fix that. So right now I am waiting on the following:

  • Header
    Actually I need a whole exhaust. This is the thing that is preventing me from starting the car.
  • Radiator
    I found mounts that will work great for the radiator. I need to clean them up and paint them. I need the header done before I mount up the radiator
  • Finish wiring
    I need to get the car running to be sure all the wiring is right. Once that is confirmed I can cut the rest of the wiring from the Cabby.
  • Fluids
    I do need to fill all the fluids, oil, coolant, power steering.
  • Suspension
    This is not something I need to start and drive the car. But I will be modifying the suspension.
  • Wheels and Tire
    I was hoping that I could use the factory wheels and tires. The tires are very dry rotted, and not safe. If I have to buy tires, I am getting wheels too. Man wheels are expensive. :/
  • Interior
    This is just a matter of getting everything installed and cleaned. I will be redoing a lot of the interior parts, but I want this car on the road. 🙂

There are some odds and ends that I am sure I need to wrap up. I will cross those bridges when I get there. Here is a quick video so you can see the Luv A Dub process.

I am pretty pleased with the progress. I hope you all have enjoyed watching the build. If you have any questions please feel free to post them in the comments. Also, if you are doing a build similar share your progress. If you want to see more, check out the pictures on the Facebook page.

mk1 VR6 Cabriolet VR6

Engine bay before paint

Last week I polled the audience about painting the engine bay of the Cabby to prep it for the VR6. A simple factory Tornado Red! I was able to get a slight discount on some professionally mixed paint and the hardener. Let me just say, automotive paint is freaking expensive.

When I bought my air compressor a few years ago, it came with a paint gun. Like a lot of things that come in a set, I am sure this is the cheapest paint gun ever. I am painting the engine bay so it does not have to be professional grade, but I still wanted it to look nice. I got my paint and gun, and was ready to paint, or so I thought. I was missing the fitting to hook the gun to the air hose. A quick trip to Auto Zone, and I was back in business.

I mixed the paint and chemical hardener, and started to paint. I quickly realized that getting the paintspray pattern right is an art. The painting went something like this:

mk1 VR6 Cabriolet VR6

The result of poor spraying skills

  • Spray paint, globs of paint come out of the gun.
  • Adjust the pressure on the compressor
  • Spray paint, slightly less globs, but still too much paint
  • Adjust the pressure on the compressor
  • Spray paint, almost right
  • Adjust the pressure on the compressor
  • Spray paint, FINALLY I got it right
  • Run out of paint. :/

By the time I got the spray right, and the hang of the paint sweep, I ran out of paint. I am pretty sure that paint should have been more than enough to cover the engine bay. The engine bay was now splotchy with red, and missing paint in some spots. Like I had said, it’s the engine bay. It does not need to look perfect, but this looked awful.

After some mulling around(aka being mad about the poor job I did) I decided to head back to the auto parts store and pick up some rattle can spray paint. I was able to even out almost all the paint with the rattle cans. Unlike using an air powered paint gun, I can spray paint pretty well. Overall it came out pretty good. I have a few paint drips that need to be sanded and cleaned up. The red rattle can color is not an exact factory match, but it’s close.

So what is the next step? Well I should be bolting the engine in this weekend. After the engine is bolted in, it’s baby steps to get the car running. I was thinking that it may be fun to do a little contest. The sweet prize will be bragging rights. Post in the comments the date you think will be the first start up of the engine. My guess is August 16th. What do you think?

You can also go back and check out all of the progress we have made over the last year at Luv-A-Dub. Or click the tab at the top of the page.

mk1 VR6 Cabriolet VR6

After the respray

Mk1 VW VR6 Cabriolet

It has basically been forever since I have done a post about the VW Cabby. Today I want to give you all some updates and show ya some pictures of how the Cabby sits right now. I have owned that Cabby for just over a year now. All things considered I am pretty happy with the progress. I am hoping to have her one the road before the end of summer. Should we all take bets on whether that will happen or not? LOL 😀

The VR6 Build
The rebuild of the VR6 engine is almost complete. The long block(engine block and cylinder head) are built. Most of the accessories are installed. The water pump is the only thing that needs to be installed before the engine goes in the Cabby. The transmission is all painted up. I still need to paint the axle flanges, and install new axle flange seals. I am thinking by Saturday the engine and transmission will be bolted together. THAT is exciting.

Stripped MK1 Cabriolet engine bay

Working on getting the engine bay ready

The Cabby Engine Bay
This is what I have been working on the last few nights. Cleaning, sanding, cleaning, cleaning and then more cleaning. There is an amazing amount of dirt and grime that sticks to the engine bay of a car. I have no intention of doing the “shaved bay” thing that many other are doing. I think that is a really cool thing to do. I would just like to drive my car some time this decade.


The Interior
I can sum up the interior of the car in 1 word, DISASTER! The interior is pretty much stripped. I wanted to be sure I could run the new wiring neatly. Plus I wanted to remove the last of the sound dampener from behind the dash.

What is left?
When I start to think about all the things left to do, it gets overwhelming. Here is a quick list of things I still need to do or to get:

  • Have the ECM tuned
  • Get a suspension setup
  • Wheels and tires
  • Pick up a battery box, for the trunk
  • Exhaust including header
  • Spark plugs
  • Radiator and fans
  • Pressure line for the power steering pump
  • Serpentine belt
  • Wiring, wiring, wiring, wiring and probably a little more wiring

I am sure that I have many more things that I am forgetting. I am learning that the key to staying motivated during a build like this is to celebrate the small victories. Getting the engine bolted into the car will be my biggest victory yet!

Well, that is where we stand with the Cabby! You can check out all the Luv-A-Dub progress at MK1 VR6 Cabriolet. Also a big shout out to Justin at GermanAutoParts.com and Mike and the boys over at EuroWise!