Tag Archive for: VR6

VR6 Coolant Pipe and Thermostat Housing DIY

IMG_4010
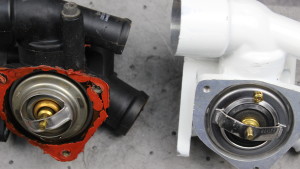
This is a DIY on replacing the VW VR6 coolant pipe, aka Crack Pipe, and thermostat housing. on the AAA VR6 engine. We learn how to replace the pipe and a few things to be careful of. This is another video in the MK3 DIY series. You can check out the Mk3 GTI walk around video I did. This is also a DIY that I struggled with. It was one of those jobs that very little goes right. I will probably do a video showing all of that.

Important information before starting this repair:

  • Tools needed for this coolant pipe DIY
  • Eurowise Thermostat Housing
  • Eurowise thermostat housing review
  • Some struggles I had doing this repair
  • Removing the front end is not always necessary, but can make it easier
  • Check out more DIY videos here
  • Here are all the MK3 GTI videos
  • and more

Trouble veiwing? Watch “VR6 Coolant Pipe and Thermostat Housing DIY” on YouTube.

As always I love to hear your thoughts. Please post them in the comments section below. If you have an idea for a show you can email me, or use the contact me form! Don’t forget to follow me at:VR6 Coolant Pipe and Thermostat Housing DIY

MK3 vr6 GTIMy newest project car is this 1998 MK3 VR6 Volkswagen GTI. This is a quick walk around video showing some of the good things and some of the GTI problems. Follow allow this video series and see how I turn this GTI back into the car it once was.

Show resources:

Join me today as we break down (hopefully not):

  • Engine code
  • GTI issues under the hood
  • Concerns about the interior
  • Issues with paint on roof
  • Under car concerns
  • The best part about the car
  • Upcoming DIY MK3 DIY videos
  • and more

Trouble viewing? Watch “MK3 Project Car Walk Around ~ Video 1” on YouTube.

As always I love to hear your thoughts. Please post them in the comments section below. If you have an idea for a show you can email me, or use the contact me form! Don’t forget to follow me at:

Aluminium VR6 housing

Today we are going to be checking out the Eurowise aluminium thermostat housing for AAA VR6. Eurowise has become the go to place for VR6 goodies. And specifically VR6 swaps into MK1 cars. I used their kit on my Cabby. I also did a review of their “MK1 VR6 Engine Swap Kit” I was really excited to check out this thermostat housing. It does a great job of fixing a common VW coolant leak issue.

About Eurowise
They are located in Charlotte, NC and specialize in maintenance, repair, and modifying all European cars. I had the pleasure to meet a lot of the guys down there. I can tell you they are awesome! Check them out:

Join me today as we break down:

  • About the Eurowise Aluminium Thermostat housing
  • What is in the box
  • Add on goodies
  • Finishing options from Eurowise
  • Likes
  • Dislikes
  • AAA VR6 Thermostat housing.
  • Learn more about the VR6 Engine.

Trouble Viewing? Watch “Eurowise VR6 Thermostat Housing Review ~ Video” on YouTube.


As always, post your comments below. If you have a tool or product you would like for me to review, use the contact me form. Or email me Charles(at)HumbleMechanic(dot)com, and put TOOL REVIEW in the subject. Thanks to Mike and all the boys from Eurowise for being such a great part of the community.Aluminium VR6 thermostat housing

Don’t forget to follow me at:

Automotive Podcast

Happy Monday everyone. I hope you all had a rocking weekend. How about those Super Bowl commercials? Oh, and if you are a football fan, what a great game. What were your favorite Super Bowl commercials? Here are my favorite automotive related commercials:

Today on the show I take your questions. To get a question on a show like this, email me Charles(at)Humblemechanic(dot)com and put QUESTION FOR CHARLES in the subject. It is just that easy. 🙂

Today on the automotive podcast we chat about:

  • Moisture buildup on the bottom of oil caps
  • My thoughts on the 3.6 VR6
  • Cold start misfires
  • Harsh shifting in a DSG
  • Carbon buildup
  • Removing an engine
  • Keeping my beard clean at work
  • and more

Having trouble with the video? Watch “Viewer’s Questions ~ Podcast Episode 40” on YouTube.

As always I love to hear your thoughts. Please post them in the comments section below. Again, if you have a question for a show like this, email me Charles(at)humblemechanic(dot)com with Question for Charles in the subject. Also if you have an idea for a show you can email me, or use the contact me form!

Don’t forget to follow me at:

VR6 Engine

The VR6 EngineToday we have something totally different. A few weeks ago Jason from Engineering Explained, one of the best channels on YouTube, and I did a video collaboration. Well, he did all the hard work, and I just rambled about the VR6.

His fans had been asking him to do a video explaining about VW’s VR6 engine. It just so happened that I had a few VR6 parts around the shop. One of the things about the Cabby build, plenty of extra parts. I sent him some video of the engine block and the cylinder head. He mated that with an incredible white board explanation of how the VR6 works.

As you guys know, I have an affinity for the VR6. It is such a cool design, not to mention that it looks SWEET in the MK1 Cabby. I also shot some audio of how wonderful the exhaust note is.

If you are having trouble watching on the blog, check out VR6 Explained on YouTube.

Well folks, there you have it. You are now experts on the VR6 engine. Big thanks to Jason for letting me work with him on this video. Check out all his amazing work at:

VW cabby with top removed
MK1 Crossmember Reinforcement Bar

This is the brace I installed from Euro-wise. I HIGHLY recommend this!

Happy Monday everyone! I hope that you all had a great weekend. One quick thing before we get into why I never throw away parts. I have been having email issues lately. Not sure what the deal is, but the folks at HostGator are working on it. If you have emailed me in the last few days, and not heard back, please resend it. I forwarded my email to another email. Sorry for any troubles.

Alright, like the title says, I never throw away parts. Even things that I don’t think I will ever need. Something happened Saturday that validated my crazy hording of VW parts. I sometimes think that I will clean house and get rid of things. Sadly I don’t think it will ever happen. On that note, if you need any VW parts let me know 😉

On Saturday I drove the Cabby Luv-A-Dub to work. My plan was to install a front brace, and remove the convertible top. The shop was pretty busy all day, so got a late start. The install of the brace was a little more work than I wanted to do. I had to remove the front engine mount and move some wiring out of the way. It was one of those jobs you think will be quick, but doesn’t really work out that way.

The excitement didn’t really start until I was finishing up the job. With the brace installed, I wanted to start the Cabby up to let it warm up a little. I hit the key and got crank crank crank crank crank, but no start. Dang, let’s try it again, crank crank crank crank, no start. It was clear at this point that something was not right. When ever this type of thing happens, step 1 is recheck your work.

I did a quick visual inspection of the brace and the area I was working in. Nothing stood out as an issue. I did have the power junction disconnected, but that could not be the issue. I could also hear the fuel pump running when I was trying to start the car. At this point I am starting to get annoyed. I just wanted to go drive!

I grabbed my laptop to check for fault codes. I have to say, having OBD2 in the Cabby is pretty awesome. Sadly, it was no help. I had fault codes stored, but that was due to several sensors that I didn’t use with the swap. In diagnosing a no start concern, this is the time to pick a path and go. You only NEED 3 things for a engine to run

  1. Compression new this was good. I drove the car in the shop. Plus you can usually hear when an engine has really low/no compression
  2. Fuel
    I knew the pump was running, but not sure about the engine getting fuel. This would have been a good next step.
  3. Spark
    This would have also been a good check.
  4. ECMI know I said you only need 3 things, but the ECM is vital. It controls spark and fuel, and it wont give you that if it doesn’t see what it wants to see.

Before I started taking fuel lines off, and checking for spark, I decided to go back over my work one more time. I raised the car up and did another visual inspection. DANG IT, didn’t see anything. After seeing nothing again, I did one of my top secret diagnostic techniques.

Mess with stuff until you find something.

I started giving all the wiring harnesses a tug. I barely touched the harness for the crankshaft position sensor when I heard a beeping and buzzing. YES, now we are on the right path, it was also lucky that I left the ignition on 😉 Now that I had something to go on, it was time to fix it.

I disconnected the sensor, checked the pins and connection. They were all good. I found that if I touched the harness on the sensor side, that beeping and buzzing would start again. I tweaked the harness so that the beep was constant.Side note, I am still not sure what was beeping. With the harness tweaked, the car would start.

VW cabby with top removed

I LOVE how the cabby looks with the top removed

The harness for the crankshaft sensor is sealed. That means it should not be repaired, but replaced. I dug through a box of parts I set a side to bring home. Wouldn’t ya know, there was a replacement crankshaft sensor! I replaced the sensor, and BOOM she fired right up.

So the moral of the story is, cars  break. It is never a bad idea to have a few extra parts laying around. I am that guy in the shop that everyone comes to when they need a part. Having this sensor saved me over $100 and my wife from having to come pick me up at work. I am happy to be a lucky auto mechanic.

MK1 Vr6 Volkswagen kit

Hi everybody!
It has been almost 3 months since I last did an update on the Cabby. There are a few reasons for that. The main one is, I have not touched the car in that long.

When we last left our hero
I was driving her home from my work on Thanksgiving. I was almost home when a fuel line broke and started pouring fuel. While it is a very simple and cheap fix, I just have not gotten to it. And to be honest, I am not a fan of working on the cold garage floor.

It is a strange thing for me. I am either all in or all out on projects. I spent so many hours last year getting the cabby built. I think I needed a break. Plus driving a convertible in winter is not nearly as fun as in the summer. I am starting to get he bug again.

MK1 Vr6 Volkswagen kit

Until I get the fuel line fixed, this is how she sits. Luckily I am not too concerned about the “paint” 😉 And yeah, I know my Passat needs a bath.

I know that today was a short update. I wanted to fill you all in on what is happening with the cabby. I guess I should have said what is not happening. In the last Cabby update I go into more detail about this years plans.

Call in show
I set up a call in line on Tuesday. Now I have a way for you to call in your questions. I would love to hear from you guys with your questions. I really want to get this segment rocking, but I need your help.