Tag Archive for: damage

Volkswagen Jetta Seat Auto Mechanic

Hey everyone! We got some Shop Shots for ya today! Remember that all of these pictures come to you from behind the scenes of a VW dealer. These are some of the things that an auto mechanic will see from day to day. Some good, some scary, some super gross, but all of them are the real deal Okay, let’s go~

Here is a picture of a catalytic converter on a 2007 GTI. The customer had a performance exhaust installed on his car. At some point, he had an aftermarket catalytic converter welded in. That bright shiny elbow is a cheat. It is a way to trick the cars computer into thinking that the cat is functioning properly. It moves the rear oxygen sensor further away from the flow of exhaust. That reduces the amount of air it sees. This will let someone install a high flow cat, or no cat at all, and the MIL will not come on. I think some stuff like this is really cool. I like when people find a work around. Of course I officially don’t support cheating the system.

20120509-092515.jpgThis was the very first car I worked on the other morning. The customer was saying that the seat back would not adjust. He very cleverly took some bungee cords and secured a couple of pillows. To be honest, it was a pretty cool setup. I would imagine that it would be super comfortable on a road trip. One thing to consider is that an improperly adjusted seat back can be a safety issue.

If you have ever had a VW, you might have noticed that the seat back adjustment is strange. It has that knob on the side that needs to be turned. I have had lots of folks tell me the knob didn’t work. The trick is to lean forward just a little, and the seat back will move just fine. This setup is suppose to be a safer design than the lever that most cars have.

Oh, this car’s seat worked just fine. I lubed his squeaky door and sent him on his way.

20120509-092634.jpg
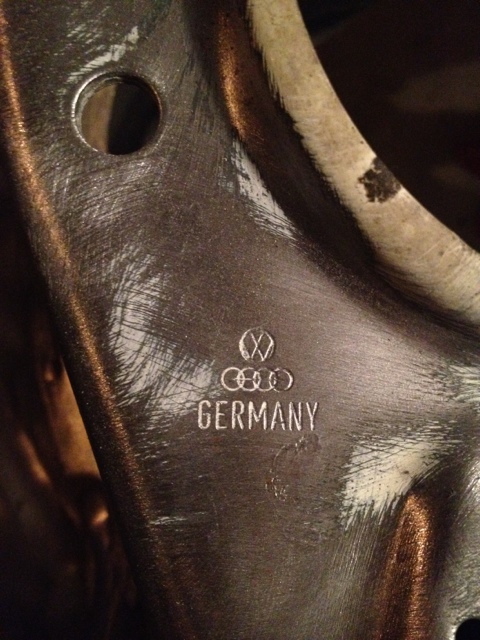
This is another shot from outside the shop. I was visiting a buddy who is restoring a GTI. We were in his garage having a good craft beer, and chatting about his plans for the car. I looked down and this caught my eye. How cool is it to have a 25+ year old car with that logo on it. AWESOME! Yeah, that was just a little VW nerding out on my part

20120509-092724.jpg
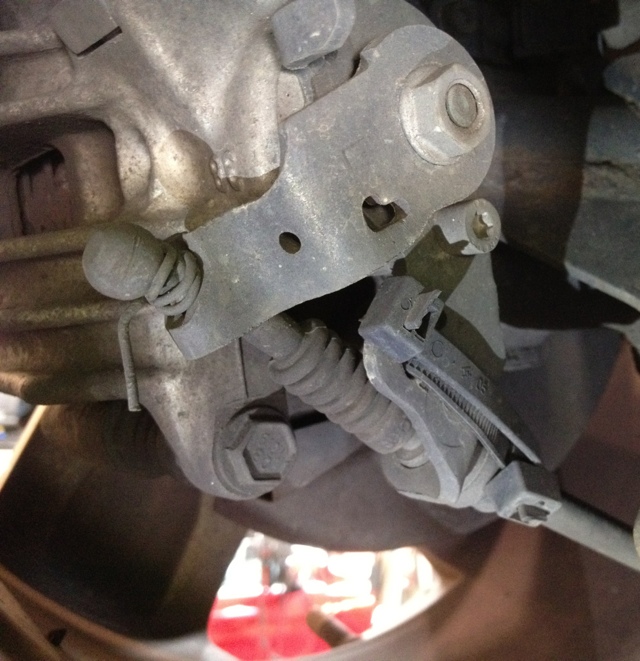
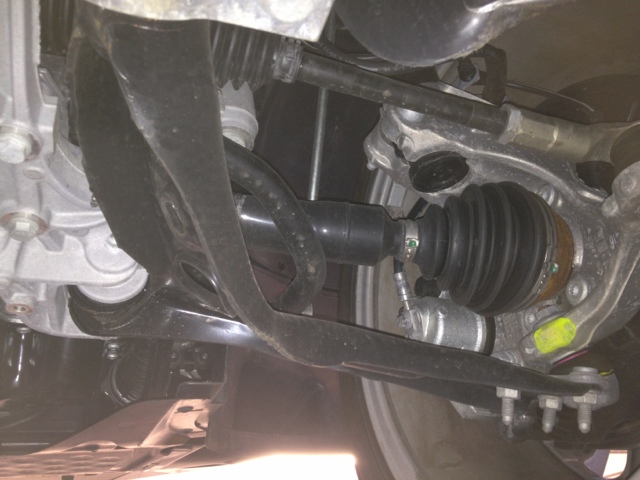
This picture goes along with the video below. This is a CC with about 900 miles on it. The customer slide into a curb and restored the wheel and bent the control arm. That piece should be NOT be bent like that. When you watch the video, you will see what it looks like from the outside of the car. The rumor is the guy was wasted when this happened. I have no way of confirming that!

So, you might have noticed that sweet intro on this video. A good friend of mine built that for me. I can not take any credit for it (I wish I could). This will be on all of the videos going forward. I almost peed my pants when I watched it for the first time. This dude is so damn talented!

Ok, back the video. You can see how close the tire is to the back of the wheel well. The whale noise that you are hearing is the rim scrapping the control arm(the bent part in the pic above). We were really cracking up about the damage.

Well, there you have it, another round of Shop Shots in the books. A quick Cabby update, I drove her home yesterday. She is now safe and sound in my garage. I have to swing by work today and pick up the Passat..

If you think that the intro is totally amazing, mash one of the share buttons! It will help me thank the guy that made it.

VW Beetle TDI with damage

Well folks, it is that time again! We got Shop Shots of automotive service today! This week we have 3 “shots” and one quick video of a smoking Tiguan! 3….2….1…. GO

20120418-095917.jpg

What you are looking at here is the result of a Beetle doing some “off roading”. The part that is sticking out is the Tie Rod. The tie rod is part of the steering system. It is the link between the steering rack, and the wheel. As you might be able to guess, it should not be belt at a 90degree angle. The tire you see is the left tire. notice how it it turned all the way to the right. What you can’t see is that the right tire is completely straight. I have seen many bent tie rods, but I don’t think I have seen one ripped from the steering rack. I am pretty sure the damage totaled the car. Sad to see a TDI go out like that.

20120418-095950.jpg

This is a picture of the screen of our VW scan tool. We have a program called Guided Fault Finding. This program has several tests for almost every system of the car. If a car has a fault, it can automatically load a plan to test the fault. It usually works pretty good, despite what some mechanics would say. Every now and then, you get some random repair instruction like this one. It is basically telling me to

  1. Check the connection
  2. Find the problem
  3. Repair it

HAHA, Duh! What the heck else would I be doing? I always get a kick out of this stuff. That and when you get a random screen that is in German!

20120418-100004.jpg

If you read the post the other day called “Throwing Automotive Logic Out The Window”, you would have read the story about an alternator causing the engine not to start. Well here is the failed alternator. You can see the ball bearings at the bottom of the pulley mount. That should not be that way. I do not really have an explanation as to why this happened. Thankfully it fixed the no start problem. I wish I could have taken it apart, to find the failure. There are some parts that we have to return to VW. They will manufacturer this and resell it after fixing it.

Oh hello pollution! This is a little video of a VW Tiguan that is obviously smoking. The problem here is a fuel injector that got stuck open. It causes way too much fuel to be sent into the engine. The high amount of fuel is not able to be fully burned. The only place for it to go is down the tail pipe. The result is awful smoke coming from the tailpipe. I hope that the customer had the car towed it. I would be mad if I was driving behind that car!!

I hope you all have a really great Wednesday. I am off work, but will be busting my butt to get some flooring finished. Don’t forget to signup for email updates. I know I keep saying “I got things in the works”, but I do, and the email list will get 1st dibsies!

Like this post? Share the love and mash one of the buttons below, but remember, you might not have a touch screen. You can still mash it with a mouse. 😉

Check Engine Light OBD II

Most of us know that, “BEEEEP” from your car, followed by that little amber light, that looks like an engine with a lightening bolt in it. Or maybe even the phrase, “Emissions Workshop” showing in the instrument cluster. But do you know what it means when your vehicles check engine light comes on? Understanding what your check engine light means can save both headache and wallet-ache! Before I get into what a check engine light means, let’s talk about what it is, and why we even have it.

All cars from model year 1996 and newer are set to a basic standard. That standard is known as O.B.D II, short for On Board diagnostic second generation. It basically says that all cars will meet a certain standard when it comes to diagnostics, they include

  • A standard connector to hook up a scan tool. This is so all shops can gather the same information.
  • Standard(ish) location for the connector, called a Data Link Connector or DLC for short
  • Standard codes, basically if a VW has a failed sensor, and a Honda has a failed sensor, they must use the same code to describe the fault, more on that later.
  • There are more standards, but they have to do with communication rates, and more things that do not really matter.
  • Also, the light itself has a standard(ish) look to it.

    VAS 5051B Volkswagen scan tool

    Here is the VAS 5051B hooked up to an EOS with a top issue

When your check engine light comes on, it means the cars engine computer sees an issue. The issue can be anything from a loose gas cap, to engine timing being wrong, or some crazy wiring issues. I could go on for days and days about all the ways that the check engine light can come on.

When you bring your car to have the codes checked, I would hook up a diagnostic tool. I generally prefer a VAS 5051B. That is the big boy of VW scan tools. I find it to be far more reliable than the other scan tools we have. The information that I get is show like this.

P0420, Catalyst efficiency below threshold.

The “P” code is used to determine what system the fault is. P0420, the P is for power train, the 0 means that a Fuel and Air Metering and Auxiliary Emission Controls fault exists, and the last 3 digits give a more specific system of failure.

Check engine Lights

Your check engine light might look like one of these

There are 3 states of your check engine light.

OFF
If your check engine light is “OFF”, you generally have nothing to worry about. There might be an issue, but it has not happened enough times to set the light. Most issues take 2 failures in a row to turn the light on.

ON
If the light is “ON”, you have an system in your engine or transmission that is having an issue. If your car is driving normal, get it to a service station when you can. I DO NOT recommend waiting for an extended period of time. The longer you wait, the more likely you are to have more issues.

FLASHING
Ok, this one is pretty serious, if the light is “FLASHING”, you need to STOP driving and have the car towed to a service station(I prefer the dealer of course). When the light is flashing, your vehicle is mis-firing. That means the air and fuel is not being used properly. This will cause damage to the vehicle emissions system, and that is expensive.

Some quick advise, if your check engine light comes on, check your gas cap first. It is free, and might eliminate the hassle of bringing your car in for service. Also, if your light is just “ON” and the car runs fine, don’t panic. Just get it fixed soon.

Don’t forget that we have are on facebook. Also, if you hate check engine lights, just click one of the share buttons below, it will eliminate them forever~well, not really but it is worth a shot right 😉

VW brake caliper with zie ties

No, you are not losing your mind, it is Wednesday. I am thinking about moving Shot Shots up to Wednesday. What do you guys think, Yay, Nay, Don’t care as long as I post it? Today I have some more insider pictures for you.

20120411-134309.jpg

HAHA, I am totally laughing about this picture! I actually took this today. It is a picture of a rear brake caliper on a 2001 Jetta. From what I can tell, the parking brake cable is missing a clip. Of course the best possible repair is wire and zip ties. There are 2 zip ties where the clip should be. The ball should not have that wire wrapped around it. I understand that people can’t always afford to fix their car properly, but PLEASE do no use zip ties on your brakes!

20120411-134325.jpg

Would you believe that this is the SAME car? I have not seen a Jetta in this bad of shape in a long time. This is the mount that limits movement of the engine. It is commonly known as the “dog bone” mount. I guess that they lost the bolts? The thing about this repair is, it is not safe! Remember when we talked about safety being more than seat belts? Well this is a perfect example of something not safe. The bolts that belong in that mount are meant to shear. When the wrong bolt is used, it changes the needed force to shear the bolt. It may never be an issue, but it is something to think about. Side note, I am pretty sure this car could be several posts all on its own.

20120411-134337.jpg

Ah the pink trail of death! The cool thing about VW coolant is that it is pink or purple. When it leaks, then dries, it leaves a trail of dried coolant behind. This can make finding leaks easier.If you are ever looking at a used VW, be sure to check the coolant pipes for this trail. This leak is actually hidden. The only reason I seen it was, the catalytic converter had been removed. The guy working on it, was replacing cats on a V6 4motion Passat. It is really one of the worst jobs we have!

20120411-134347.jpg

What you are looking at here is the bottom of an oil pan removed from a EOS 2.0. If you look close, you can see the reflection of me taking this picture! The reason I took this was the carbon sitting in the bottom of the pan. If you notice the chunks in the middle of the pic, that is what I am talking about. This forms due to lack of oil changes. The customer might have been following proper maintenance, I don’t really know. Just another reason why I think a 10k interval service is WAY too long. This was an issue on the B5/B5.5 Passats like mine. PSA-Change your oil, with the proper oil!

Well folks, that wraps up this weeks Shop Shots! If you would like me to keep doing this on Wednesday, let me know in the comments. If you don’t care what day, as long as you get them, post that too! Don’t forget, you can @ reply me on Twitter, if you use twitter! Also, don’t forget I am getting questions together for another Rapid Fire Q&A. If you would like to submit a question, the easiest way is to use this Contact Me form, or post in the comments!

If yo have enjoyed this post, do consider sharing it by clicking one of the icons below, it will share it with your friends and people you think are cool! 🙂

Cabrio top

As you guys know, I have been looking for a project Volkswagen. I have my eye set on a Cabrio/Cabriolet but people think they are worth about double what they are actually worth. I decided to open up my search to add a GTI in the mix. Well wouldn’t you know I was able to find a 1996 GTI on Craigslist. The ad was pretty good, and noted that there were some issues with the car, but what did I expect from a 16 year old car.

Cabrio top

This was my 1st project VW. I only paid $500 for this Cabrio. I sure do miss it.

All ready to buy this car, I made the 40 mile trek to check it out. When I got there, I knew almost instantly, this car was not what the ad said. I don’t

think that the kid selling it was being deceitful, but I know that he was not telling the whole story. I spent about 45 minutes picking the car apart. Everything from damage on all sides of the car, a very oblivious water leak, and every light in the dash lit, to no a/c system, and headlight wires just flopping around. Yep, it had NO headlights.

The sad part for him is I really know this car. I can spot something out of place pretty quickly. The more I looked at this car, the more I found wrong, and more I found wrong, the less I was willing to pay. It pretty much broke down like this.

  • He posted the ad for $3000
  • Next day he changed it to $2500
  • I noted ALL the issues and offered him an offer of $1500. It would have cost me a few hundred dollars to get it drivable.
  • We went back and forth, me being very firm on my offer, and could not come to a price

Now I am only a little bummed that I could not get this car. There are 2 things that really make me mad about it. The poor car was abused. I hate seeing an awesome car ruined like that. The more important issue is, he will sell that car, and get what he wants for it. To someone that doesn’t know this car inside and out, it will seem like a good deal. It looks a little rough, but it “runs good”.

I thought I would put together a list of things that must be checked when looking a buying a used car. This list will help you avoid a big problem. Just a couple of warnings. This list will not predict the future. There can be hidden things that you will not see. I recommend using this list to deciede if it is worth getting checked out by a professional. I ALWAYS ALWAYS ALWAYS, one more time, ALWAYS recommend getting it checked out by a mechanic, but more on that later

  • Do a walk around the outside, check for damage, and really look at the paint, even an untrained eye can spot color differences in paint.
  • Open the hood. Check the bolts that hold the hood and fenders on. Check to see if the paint is cracked. That means the bolts have been moved due to a repair.
  • Check ALL the fluids you can. On top of being clean, give it a good sniff. If it smells burnt, that is a no go
  • Check for fluid leaks. Most fluids will leave a trail the engine should not be wet with oil or coolant. Look at the fans, make sure they turn. PLEASE do this with the car off.
  • If you can see any electrical connectors, make sure they are not broken. Even if you don’t know what they are for, you know they should not be broken.
  • Wiggle stuff, Most car manufacturers do not let parts just flop around. Things are almost always secured in some way.
  • Check where the windshield and meets the cowl(that is where the wipers are) Bad seals there can cause a severe water leak.
  • Moving to the inside, open the door and take a big sniff. Water leaks have a very distinct smell. It kinda smells like a mildewy basement.
  • Look at the roof, see if there is any water staining around the windshield, windows, sunroof.
  • Touch the plastic of the interior. Lose trim can mean someone was “fixing” things
  • Look at the door jambs. Often side damage is not repaired as well on the jambs as it is on the outside
  • Open ALL the doors, make sure they open and close properly, and don’t over extend.
  • Open the trunk, check for the spare tire, and look for cracked paint on bolts, cracked seals, water
  • Check all the lights inside and out. Take a look at the tires, and brakes. I did a post about 5 quick car checks a while back, check it out for more information.

Since you will not be inspecting the car on a lift, there is no need to talk about the underside of the car. Leave that to a professional. Remember, before you buy a car, have it checked out by the DEALER! Yep, do not take it anywhere else. You might think that dealers are a rip off, but no one sees more of that specific car than a dealer mechanic. Now, if you make it this car, please take the mechanics advise. I have done used car inspections for customers, found a lot of issues, and people still buy the car. Then come back a few months later saying their car has all these problems. (D’oh)

Well, my search for a project VW continues. I will be sure to keep everyone posted about the search.

If you like this post, please feel free to share it by clicking your favorite button below! 🙂

I moved “Shop Shots” up to Wednesday this week. I will actually be out of town for a couple of days. I don’t think there will be a post Thursday or Friday. Make sure you check out the forum too. I know its called Technician DataBase, but its not just for techs. It is for everyone, customer, mechanic, enthusiast, we got some fun conversations happening over there! Go to Technician Database, and sign up, I will have to approve you so it might take a few hours to join. Also, be sure to post in the “First 50” thread, you will be locked in as a founding member, and I will be giving something cool away.


This is a picture that I took on Monday. I was doing a 20,000 mile service on a 2010 Jetta, and this caught my eye. The bolt was out about 1/4 of an inch. I checked the history to see if the shop had done any work in this area. The customer did have an alignment done, but that was at ~1300 miles. I wouldn’t think that it could be loose for that many miles. I am surprised that the customer didn’t notice a clunking due to the bolt being loose.

It actually brings up a good point. When something like this happens, what does a mechanic do? If I say something to the customer, we would get blamed for messing the car up. VW warranty would not pay to tighten a bolt. The best thing for everyone is for me just to fix it. Not really hide what I found, but it was not worth stirring up trouble over. I torqued the bolt, and went through the other bolts on the subframe just to make sure they were properly torqued. I didn’t get paid anything to do it, but I surely couldn’t let the car go with a loose bolt.

This is an axle from a 2005 Jetta. The outer joint to be exact. The boot was split, so I removed the axle to replace the boot. This is actually a really common repair. Something that I have done lots of times. A couple of whacks with a 3lb sledge hammer and the joint comes right off. This one however didn’t want to play nice. I tried for about 30 minutes to separate the joint from the axle shaft. I beat the out edge of the joint up pretty bad. I finally had to accept defeat and tell the customer they needed a new axle. It really sucks that the customer had to buy a new axle, but I really did everything I could.

Knowing that the customer had agreed to buy a new axle, I was totally determined to get he joint apart. I brought out the big guns. I used my air hammer, but all I did was break the joint more. Since I had to send the old part back, I figured it was better just to call it quits. I don’t like to lose!

This is a short video of a crazy instrument cluster. This Jetta had several water leaks. I never found any water in the cluster, but something really pissed it off. This might be one of the strangest acting clusters I have ever seen. Also if you don’t drive a VW, the buzz that this cluster is making sounds NOTHING like it should. I recommend watching this a few times. Watch how fast the 2 small gauges move. This car is actually still at my work. The customer fixed the issues, but they have not came to get it yet. I think we are going on 3 months. I am pretty sure it was towed in before Christmas.

I hope you guys have a really great weekend. I will be spending some time in the forum, so swing by and say hello! Also, if you want to connect with me, the 2 best ways are on Twitter, or just email me!

So this 07 VW Passat gets towed in on Friday. The customer said something on the engine broke.

We towed it in the shop and found out the engine mount on the passenger side of the car was broken. This is not something that happens all that often, but I have seen it before.

We installed the engine support and removed the mount. This is what we found.

20120220-123200.jpg

It was obvious that someone had “repaired” the mount. The problem withy the way that it broke is, it actually broke the lower part of the engine. The proper way to fix that is to replace the engine block(the block is the bottom end of the engine). I think that someone would be able to weld it, but we have to stand behind our work.

We called the customer and told him what had happened. He got really mad at us, saying “You guys did all the work on this car”. We had done work on the car, but it was MONTHS ago, and there is not one person in my dealer that would do something that awful.

The customer came by to take a look at the damage. The estimate was in the $7,000 price range. Obviously, he wasn’t a happy guy. Well, it turns out his son had done something to the car. I don’t even know what he was trying to do, but he is the one that added all the washers and nuts on the mount.

20120220-140058.jpg

The customer decided to trade the car in for a new car. The shop will most likely bandage it back together, and send it to auction. Side Note- these are the problems cars at small buy here pay here lots have.

I am all for DIY, just know when your out of your league. Also, know what to call a professional. If you get in a bind like that, just STOP and get some help!!

20120220-140521.jpg