I was prepping my car for a road trip, and found I had a side marker light out. Here is a quick HOW TO video on replacing the light. This is the same as replacing a front side marker light on a Jetta and a golf.
Welcome to the Humble Mechanic Video Podcast. This is the show were we talk about many areas of the automotive industry. Everything from being an auto tech, buying tools, earning money, talking to customers, and more. If you are not a mechanic, tune in to learn the ins and outs of the industry. It can help you find a good tech, and help avoid getting ripped off.
I was prepping my car for a road trip, and found I had a side marker light out. Here is a quick HOW TO video on replacing the light. This is the same as replacing a front side marker light on a Jetta and a golf.
Hey folk, it is FINALLY Friday!
Today’s update on Luv a Dub is the video I promised a while ago. I had the chance to test drive removing the factory sound dampener by using dry ice. The other methods that I tried were, chiseling, and using a heat gun and scraper. The chisel didn’t work at all. The heat gun worked awesome. You can see the video of the heat gun method at Removing VW Sound dampener with a heat gun.
The theroy behind using dry ice is that it will “freeze” the dampener and make it really easy to remove. That would mean much less clean up. The issue with heat is, it leaves the tar residue behind. Lets find out if dry ice is the solution.
As you can see in the video, dry ice didn’t work at all. I left it on for almost 30 minutes and it was no easier to remove than with the chisel. It looks like the heat gun was the way to go.
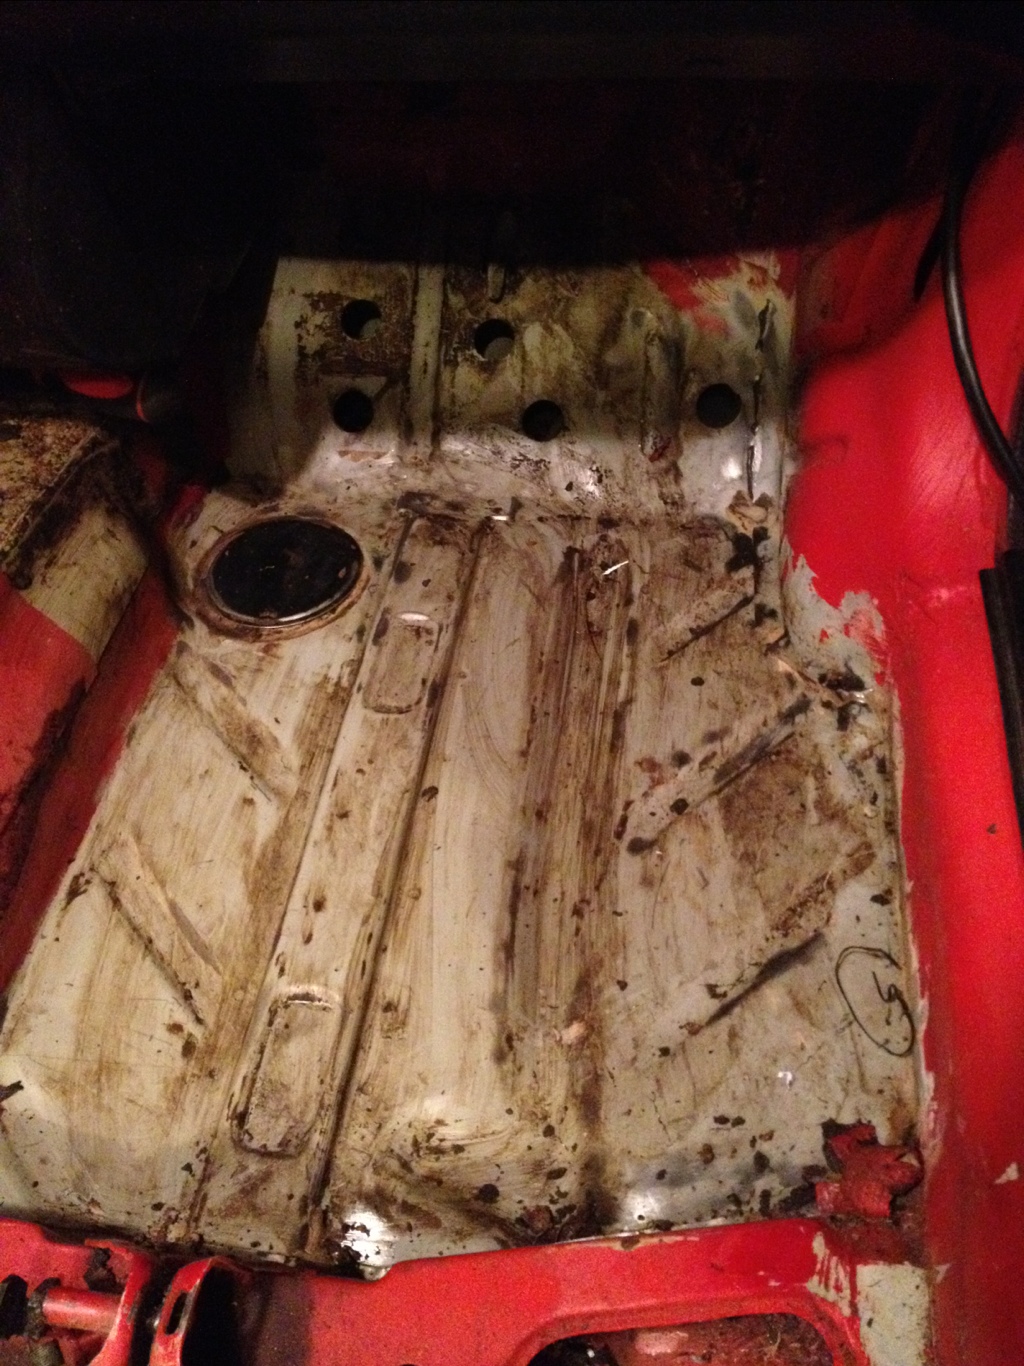
Here is the floor after removing the sound dampener. I still have to do a final cleaning.
This took me about 10 minutes of work. The dry ice took about a hour when you factor in going to get it. To me, dry ice was a waste of time. 🙂
I am actually off work until Wednesday of next week. That means I should have plenty of time to work on the Cabby. MY rust treatment came yesterday, so I will have a video up for that soon. While I am out of the shop, hit me up on Twitter or Facebook OR instagram!
What does everyone have planned for the weekend? If you got a cool project happening, share what you are doing..

Well, as promised, I shot a video of the Cabby last night. After work last night I spent a few hours replacing the clutch. I will dedicate a post solely to that soon. Lets just say it was toast!
As you can see, I have some BIG TIME work a head of me. That is the fun part about the project right? I will say that the car is in pretty darn good condition.
After I test drove it, I found it would not stay running. A vacuum hose came off on the front side of the engine. I fixed that. Then I found the distributor cap and rotor were worn out. I got those coming along with some new spark plugs.
Well, what do you think? In over my head? I would love to know.;) I hope you all have an awesome weekend. I have some pics of the damaged clutch and some before and afters for everyone. I will post them asap.
If you knew that my first car was red, click one of the buttons below. BTW my first car was red.
I can’t believe that this is the 10th volume of Shop Shots! It seemed like just yesterday that you guys were helping me name this series! As always, you will see pictures of the random things that I see around the shop. AND…..GO
![]() This is a close up of some bearing damage inside a manual transmission. This actually belonged to a great friend of mine Daniel. His concern was a noise, and trouble getting into gear. We decided to replace the transmission, but I really wanted to see what went wrong. There was metal in the fluid, so I knew that it was bad new. I did a really early post when I first started this car blog. In that post you can see the metal chunks on the drain plug. This is one of the few manual transmissions I have had an issue with.
This is a close up of some bearing damage inside a manual transmission. This actually belonged to a great friend of mine Daniel. His concern was a noise, and trouble getting into gear. We decided to replace the transmission, but I really wanted to see what went wrong. There was metal in the fluid, so I knew that it was bad new. I did a really early post when I first started this car blog. In that post you can see the metal chunks on the drain plug. This is one of the few manual transmissions I have had an issue with.
![]() While we are on the subject of transmissions, here is the guts of an automatic transmission. This comes from when I was at training for Routan transmissions. This is about 1/4 of the parts that make up the rings, clutches, gears, seals and so on. Automatic transmissions are really an engineering marvel. Actually, all transmissions are pretty awesome.
While we are on the subject of transmissions, here is the guts of an automatic transmission. This comes from when I was at training for Routan transmissions. This is about 1/4 of the parts that make up the rings, clutches, gears, seals and so on. Automatic transmissions are really an engineering marvel. Actually, all transmissions are pretty awesome.
 This is leaves, pine needles, and dirt built up on the cowl of a Jetta. On the surface it just looks bad, but it is actually a big deal. I have seen countless cars get water leaks due to leaves building up on the cowl and around the windshield. The get stuck in the water drains and that water will go somewhere. The crappy part is that somewhere is inside the car. I actually totaled 2 cars due to water leaks caused by this exact thing! One was a Touareg that was had mold everywhere. The estimate I wrote was for about $42,000 in repairs. Take a minute and make sure you don’t this happening.
Last but not least, this is a quick video of a crazy noise. This car was whistling when it was sitting at idle. When I revved it up, it would stop, but as soon as I let off the gas, it would make this noise. I remember the first time I heard this I thought, “What the hell, this is not gonna be fun to fix”. It turns out it is a really easy fix. There is a check valve that only lets air flow one way. Well it gets stuck and causes this noise. WARNING– this noise is loud, I recommend turning down the volume!
Well, that wraps up another volume of Shop Shots. I am always looking for new post topics, if you have a suggestion, just contact me, or post up in the comments. Also, don’t forget to swing by Humble Mechanic on Facebook and say hi!
I sometimes feel like the world is against Volkswagen. People are always saying “I hear VW has tons of electrical problems”. Well, I don’t really agree with that, but I will save how I really feel for another post. This is about a REAL problem I found on a Jetta.
The customer comes in and says “Sometimes my door buttons do not work”. After a conversationwith the customer, I find out that her driver’s door is not working all the time. There are times when we have to extract the right information from a customer.
When I got in the car, I checked the door. Big surprise, everything worked just fine. I pressed every button on the door, they all worked like a charm. I pressed the auto-down button for the window, and opened the door. When the door got about half way open, the window stopped, all the lights went out on the door, and the instrument cluster started beeping funny. Well you can check it out in the video.
Strange isn’t it? It turns out that the ground wire in the boot between the body of the car and the door was broken. It would make contact with the door shut, but open when the door was open. I am really glad I was able to capture it on video. Usually the strange electrical problems are so sporadic, there is no chance of catching it.
So I did a little rapid fire Q&A session. I got some really good feed back. If you have a question or a topic, article that you would like me to talk about, just contact me or post it in the comments section. I kinda liked doing it, so post it up!
Real quick, I just want to take a second and thank each and every one of you that have read my blog, liked the FB page, chatted with me on twitter, posted and comment and so on. It really mean a lot to me. The success of this site is thanks to all of you! Our little community is growing every day, and I am really excited for the things to come. Also, that you to everyone that has shared this site, that is the best way for us to grow! You folks are truly awesome!

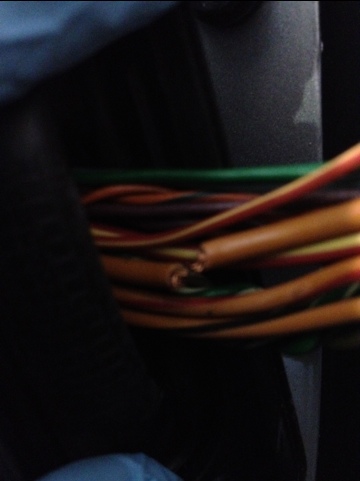
This is inside the boot between the door and the body of the car. The wire that is broken is the main ground(negative) wire. With out it, nothing will work.

Ok, to some of you this might be a really simple thing. Lets remember that at some point ALL of us had to learn this.
I shot this video after a conversation with a customer. Like I said in the video, a customer brought her car in because the 12v outlet was not working. This is actually something that happens a lot. I replaced the fuse and pulled the car around. I put a couple of extra fuses in her ashtray so that if this happened again, she could just replace it, and save a trip in to the dealer.
When I showed her the fuse that needed to be replaced, she looked at me like I was stupid(a look I know very well) 😉 Well I showed her exactly how to replace the fuse. It really hit me and made me fell like an ass. I mean, its just fuse right. Well, there was a time when I had no idea what that meant. So here is how you check a fuse with a test light. This is not the only way to check fuses, but it is one the of fastest, and I think, the easiest.
Oh, that is not the test light I use at work. I have that for use at the house.I also recommend keeping a few extra fuses in your car just in case.
Hey, if you have not checked out Pinterest, it is a pretty cool site. It has replaced my bookmarking on my computer. If you need an invite, let me know, I will hook it up! I hope you guys have an awesome weekend! I will be fighting my allergies all weekend!
Hey guys,
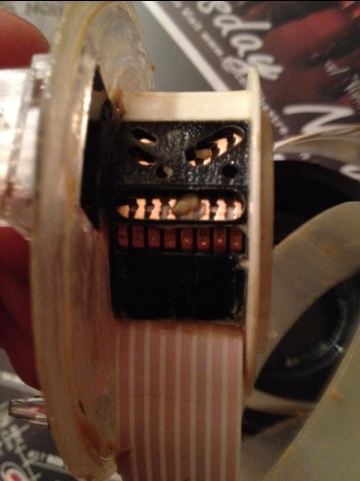
I got a video for you today. A while back I mentioned a part called a Clock Spring. I didn’t say anything else about it. As luck would have it, I replaced one the other day. Since I had the spare part, I thought that I would shoot a quick video and show you how it works.
Well, that pretty much explains it. If you have any questions, post them up in the comments. Also, go to Technician Database, that is the forum was talking about. Be sure to go and post in the “First 50”! I really want to give something cool away.
Just one more thing. Here is a little tease of the rough sketch of our new logo. What do you guys think?
